| LaymarCrafts Woodturning | Hints & Tips |
| Dust Control System for the Lathe Pt. I |
This idea started out as an experiment to find the best solution for Dust Control around the Lathe, I had for a long time been dissatisfied with the amount of Dust that "Missed" the various gadgets I had attached to the end of the Hose from my Dust Collector.
Most of these were either copied from ideas presented in various Magazines or adaptation of Collection Nozzles from other machines and devices, but none gave a really satisfactory result, with far too much Dust still wafting around in the Air of the Workshop.
The Lathe by it's very design is an awkward Machine to efficiently collect the bye-products it produces, all other Woodworking Machines have an enclosed or semi-enclosed capture area for Dust that provides a positive connection and therefore collection point, but the Lathe is open on all sides.
This means you are relying on the Dust moving in the general direction of the Suction Hose of any system, this is just not efficient and therefore Dust will become airborne and therefore a problem.
Over the years there have been many articles and papers covering the subject of "Dust Collection" but very few, if any, have tackled the subject in relation to the Lathe, every other Machine but never the Lathe, why? because I am convinced it is a too difficult a subject and no Machine available offers an ideal solution.
So Woodturners have been inundated with good ideas and "New Gizmo's" to help overcome the situation, the latest of these being the "Powered Filter" systems that have flourished, but I already have a Dust Extractor so why should I need something else?, it appears the best position for these systems (for the Lathe anyway) is directly over the Work Area, this means the Dust must pass you on it's way to the Filter.
Even with the best Respirator in the World this must increase the possibility of Inhalation of Dust and therefore I cannot see how this is the real solution to the problem, yet they get good reviews in most Magazines and I'm sure they do Suck Dust Laden Air very well, but if you are one of those who use no or limited breathing protection then, in my opinion, these are an unsuitable solution.
The Cost of Dust Extraction / Control can now become inhibitive and therefore we are more likely to see Dust as, not being a Problem and ignore it all together, at our peril.
So I decided to Experiment, firstly I wanted to have the Dust fall from the Work piece as opposed to being pulled up to the Ceiling of the Workshop, secondly I wanted to utilise my existing Dust Extractor because it was used for other Machines such as the Bandsaw and I was reluctant to spend yet more money for something I did not have either experience with or faith in.
As I previously mentioned there have been many articles on the subject but many of the suggestions would have to be tailor made to suit not only my set up, but those of others as well, and as these solutions often revolved around the use of Plastic Drain Piping and Fittings this could turn out to be an expensive folly.
So where else can you get 100mm (4") diameter Pipe/Tube? and preferably for FREE? well I found the ideal product at the local Carpet Shop, most Carpets, here in the UK at least, are Rolled onto a 4" Ø Heavyweight Cardboard Tube that becomes redundant once the Carpet is used up, it is the right size for our needs, free, and ideal because any mistakes will not hit the pocket only fill the rubbish bin.
The picture below is the basics of what I
decide was a viable solution, that appeared to achieve what was required and
allowed me to experiment without incurring any cost before finally going for the
expensive Plastic Stuff.
The criteria for my solution was catch the Dust Falling from the Lathe with Collection at a low level and close to the Work, now Dust will fall in Still Air as it is heavier than Air but the Finer Dust Particles will easily become entrained in Moving Air and therefore will take a journey around your Workshop.
I pinched an idea used in Air Curtains which are used in various Industrial applications where it is important to keep things in or out of whatever is required.
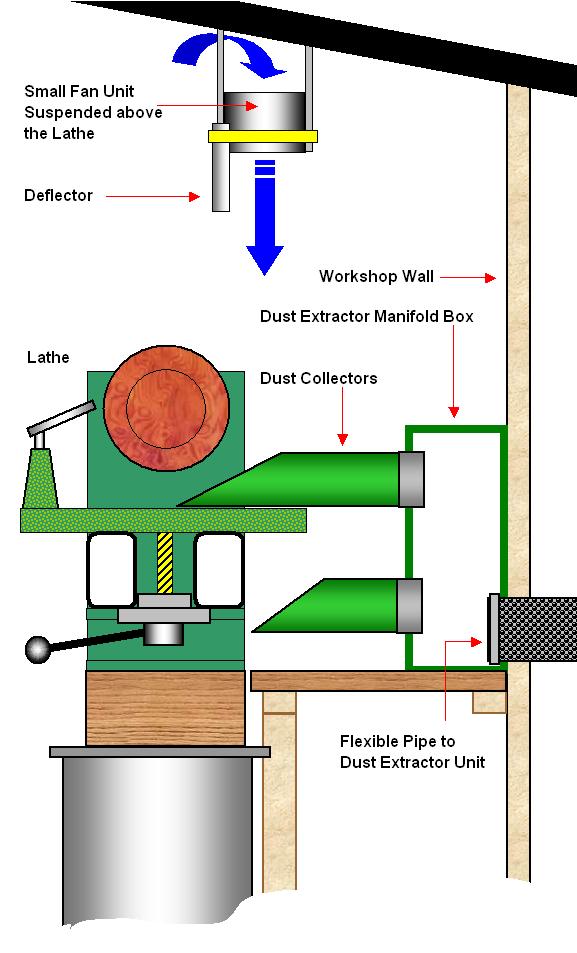
So I concluded that a Fan Blowing downwards from just below the Ceiling in the general direction of the Lathe would have the desired effect of "Forcing" the Dust down. My first unit comprised of a reclaimed Ventilation Motor from an old Microwave Oven, you do not need a High Air Volume so this was ideal.
This Fan Blower can be seen in the
picture above, the Fan as taken from the Microwave was held in a odd shape
plastic housing but with some careful trimming I ended up with a Fan supported
in a short plastic tube, I extended this with some thin Aluminum Sheet to form a
more directional plume of Air and attached a bracket for fixing the assembly to
a suitable surface.
The Sketch above shows the general layout and concept of the Fan Blower Unit, points to bear in mind are, the Pop Rivets fixing the Aluminum Duct to the Plastic Fan Ring should be positioned so as not to foul the Fan Impellor, and the Support Bracket needs to be rigid enough to prevent the Unit oscillating, these small fans are not renowned for being well balanced.
The positioning of the Fan above the Lathe should be just forward of the Chuck position, remember we wish to direct a column of Air down onto the area where the Dust is coming off of the Work piece, and just forward (away from you) of the Lathe centre line appears to be the area to aim for, more or less as shown in the top picture.
I generally only Turn using the Chuck or Faceplate, I do not do much long Spindle Work, you may well require more than one Blower or some means of moving the Blower if you require full coverage of the Lathe Bed if you are Spindle Turning.
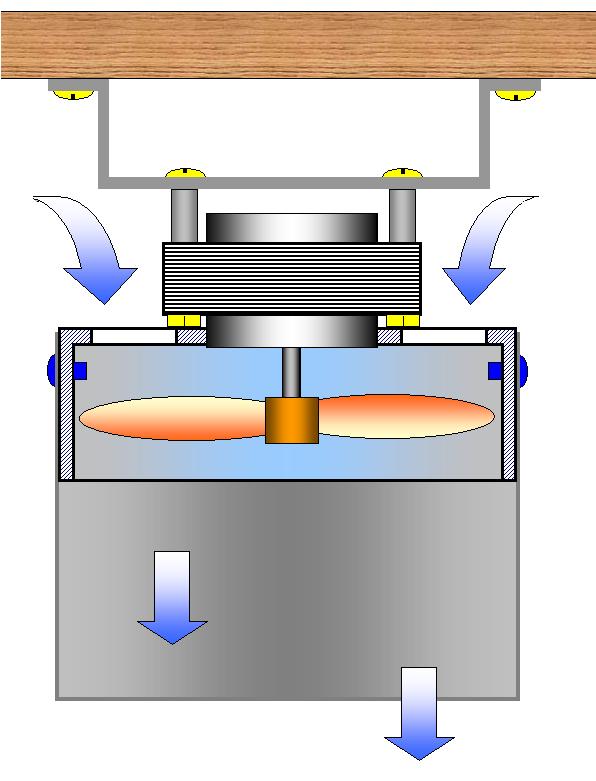
The position of the Blower is a compromise, I found the most effective position was back from the position shown but this did mean your Head often passes into the Air Stream and this not only disturbs the Air but you soon get a very Cold Head even in a heated workshop.
Even at the position shown this can still occur and I actually attached an old Mouse Mat to the Unit so that if my Head passed under the Unit it pushed the Deflector momentarily and saved the Head getting Cold.
Now I needed a "Collector" and this is where the Carpet Tube came into it's own as I had over 8m (2 tubes) of Pipe to experiment with, and by cutting the Tube and forming elbows and bends (I used the Bandsaw to do the cutting) I found an ideal set up for my situation.
My first attempt comprised of a simple single Tube standing vertical with a Angled End positioned to the rear of the Lathe just forward of the Chuck, this worked fine but was not sufficiently flexible as to the working position and under certain conditions was in the way.
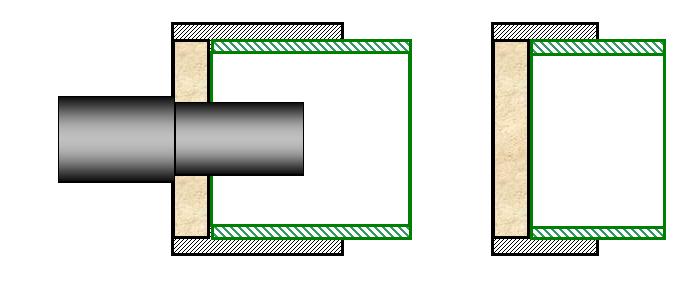
I then experimented with a Box having a series of Spigots to which I could attach suitable Collectors and after a number of trial set ups made from scraps of Wood and Duct Tape I came up with a final design the basic details of which is shown in the picture below.
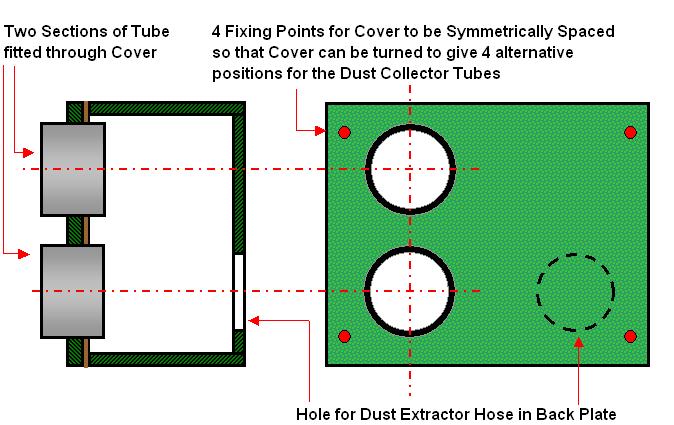
The idea was to sort out the best positioning and routing for the Pipe System then replace it with Plastic Drain Pipe but I realised that the Cardboard Tube was more than adequate and did not need replacing, so the final construction used my experimental pieces fitted into a purpose made Box for which I used MDF.
However to overcome some of the shortcomings of the Cardboard Tube I treated it with Liquid Wood Hardener (the type used to harden rotted timber) and then gave it a liberal coating of Paint both internally and externally, this has worn well and been in use for almost 12 months without any signs of deterioration.
The unit is a fixture on the shelf behind the Lathe and by making the Cover Symmetrical the Collector Sockets were usable from either side I could achieve 4 basic positions for the Collectors, which satisfied my requirements.
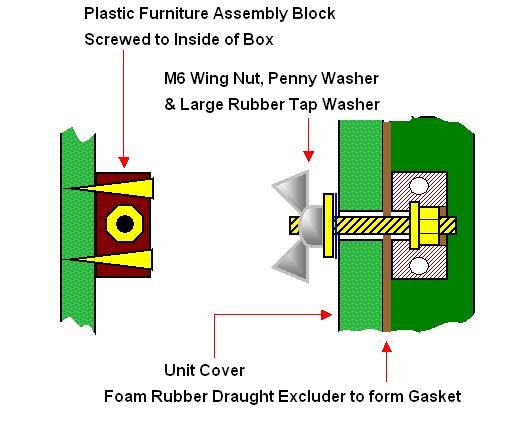
The Cover has to be removable to
achieve these positions and also to give access should the unit require clearing
out or for retrieving that item that should not have been sucked in anyway. The detail
of how I achieved this is shown below.
It did occur to me that by not having the Box fixed then the system could be positioned to suit any where behind the Lathe and this is an option you may wish to consider when designing your unit. Some points to consider are the Flexibility of the Hose from Box to Dust Collector or even having a much longer Box spanning the length of the Lathe.
My next requirement was for the Collectors, as I call them, these are made using the 4" Cardboard Tube as described above cut to various lengths with an Angled Inlet, the Short Collectors are at 45° and the Longer Collectors are at 30°, into these I have glued a Spigot, formed by taking a length of the Tube and cutting a strip out of it so that it can be slipped inside the Collector.
With the Spigot Glued into the Tube Collector and a coat of Paint the Collectors are lightweight yet durable and most importantly almost Free.
|
|
Short Collector angled @ 45°
I now also required a Blanking Plug for any opening that was not going to be used, again using the Tube and Spigot as above plus a suitable Blank, I in fact used the MDF that I was left with when cutting the holes in the Cover for the Sockets, I made not only a Plug but also a Connector for use with a Standard Vacuum Cleaner Hose.
|
|
Vacuum Cleaner Hose Connector and the Plug
This gave me a facility for using the Dust Extractor as a Vacuum Cleaner and therefore Cleaning around the Lathe became much easier, and of course being easier meant it was carried out more often.
I also have another Connector with a length of the now redundant 4" Ø Flexible Hose from the Dust Extractor which I use when doing anything on or around the Lathe that is not accommodated by the Basic System.
|
|
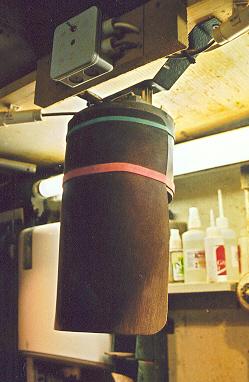 |
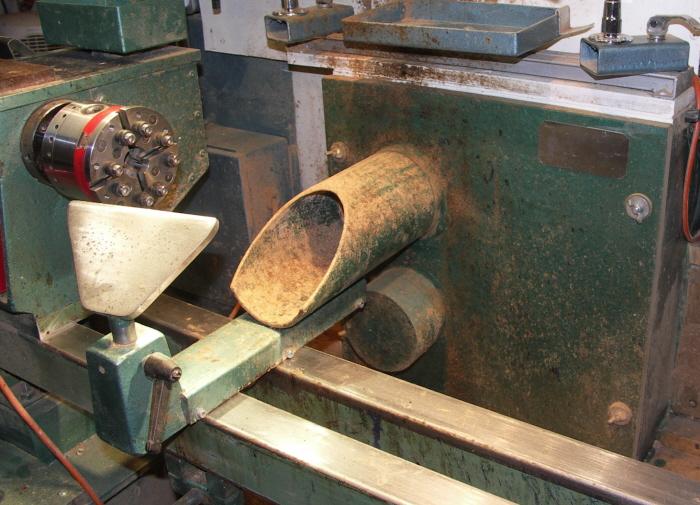
In the picture above, by using the Upper Socket with the Longer Collector over the Toolrest Slide [Banjo] you get right in below the Work, the Bottom Socket is Blanked off using the "Plug". This picture was taken after 4 years of constant use and comprises of all the original components even though they are made from Cardboard. Dirty but still 100% functional. The Picture left shows the modification I made to the Fan Unit over the Lathe, by attaching a Deflector (here I used an old Mouse Mat and Rubber bands) this directed the relatively Cold Air from the Fan away from the top of my Head and made the work area more user friendly. Above the Fan Unit you can see the Electrical Junction Box with the On/Off Switch fitted. This System along with the other measures I have taken has shown a vast improvement in the Control of Dust in my Workshop but there is possibly room for some improvements that I am considering. |
I have had this System running for nearly a year now and have noticed that the Dust Collection Bag on the Dust Extractor is emptied on a more regular basis, thus proving ,to me, that more Dust (and some Shavings) is actually being Sucked Out of the Workshop.
The Dust that previously had accumulated around the Lathe appears to be less and the Filter of the Racal Respirator that I use is performing longer between changes again an indication to me that this System is giving me an improved working environment.
The Box actually appears to work in a similar fashion to a Cyclone and any Large Objects or pieces of Equipment that are Sucked In never make it into the Fan of the Extractor and therefore preventing any damage in this area, and also making recovery of any object very easy.
The Box will over time collect a certain amount of Larger Shavings that do not pass into the Dust Bag and these require clearing out periodically however the system has never, yet, blocked up or become inefficient.
I have a number of further ideas for this system and as the parts become available I will implement the modifications and add the details of them, if they are successful, to this page, at present I am looking at having the Fan above the Lathe draw air from outside via a Duct with possibly a small Heater to temper the air.
![]() Part II of this Article.
Part II of this Article.
![]() Article on Upgrade to Overhead Fan Unit.
Article on Upgrade to Overhead Fan Unit.
![]() Article on Dust and the Lathe.
Article on Dust and the Lathe.
|
|
|
LaymarCrafts Woodturning is the Web
Site of Richard & Sheila Stapley Last update 19 July 2007
|
|
Web Site Design & Construction by Richard Stapley. |