
| LaymarCrafts Woodturning | Hints & Tips |
| A Wood Drying Kiln |
Part II, the Heater and Fans.
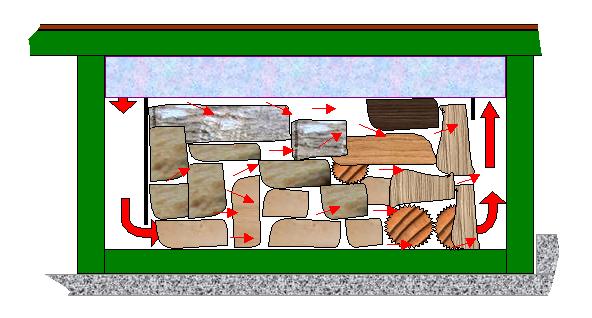
The sketch below shows the principle of the Fan and Heater arrangement in a False Ceiling/Void with directional Rubber Air Baffles at either end to ensure the Air is forced across and through the Timber Stack.
Firstly you need to source a Fan or as in my case two Fans as these will determine the depth of the Void, I used two small 90mm Ø [3½"] Fans rated at 12 Watts, each with an Air Volume of 70m³/hr [41cfm] as this reduced the height of the Void and therefore gave me more Kiln Drying Space..
With a few assumptions [the likely Air gaps between Timber pieces] and the known dimensions of the Chamber I estimated that these Fans would give something like 500 Air Changes an Hour which was well within the recommended rates I had found on various Web Sites.
I also calculated that the Heat Loss through the Chamber Insulation would be 45 Watts [10Watts per m² of external surface including the Floor] and therefore a 120 Watt Heater + the Fan Heat at 24 Watts would be more than adequate to Heat a Kiln of this size.
The Fans, from an old Refrigeration Cooler, were already mounted on a Fan Plate and all I needed to do was cut and modify this to fit across the Ceiling Void in the Chamber and make sure that the Air could not By-Pass through any Gaps.
For the Heater I used a Small Tubular Anti Condensation Heater rated at 120Watts positioned up stream of the Fan and mounted off of the False Ceiling Panel, you now need to place an additional Baffle Plate so that the Void is made into a Duct with an Air Inlet at one end and the Air Outlet at the other.
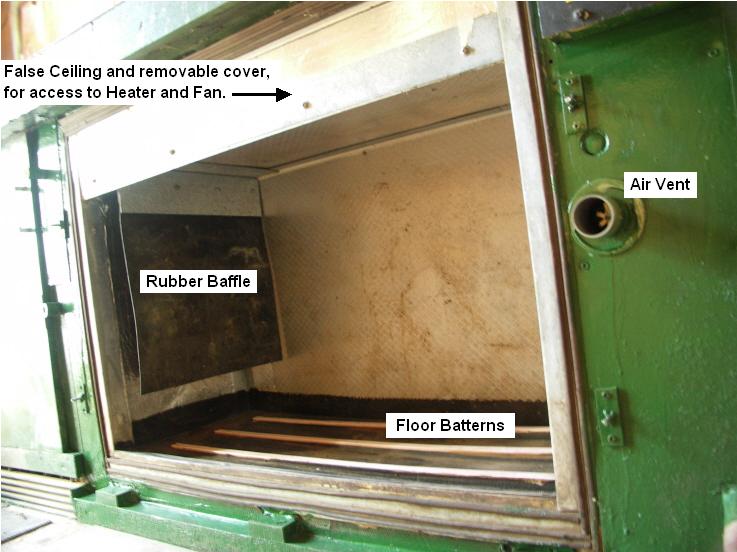
In the picture above you can see the Ceiling/Void/Duct with the Rubber Air Baffle hanging down, this is to force the Air to enter the bottom of the Timber Stack, at the other end on the Air Return side [to the right in the above picture] I have a much shorter Baffle just to make sure no large gap is present between the Timber Stack and the Void.
You can also see to the right a short Pipe, this is an Air Vent , this is normally Capped but can be opened up along with another similar Vent at the other end of the Kiln to change the Air and also for releasing Moist/Humid Air from the Kiln if necessary.
Inside the Kiln I have now included three equally spaced Battens on the Floor to make sure the bottom layer of Timber does not sit in the Condensate flowing across the Floor into the Drain Gully. these were made from wood attached to the Floor and capped with some Plastic Edging Strip [see picture above].
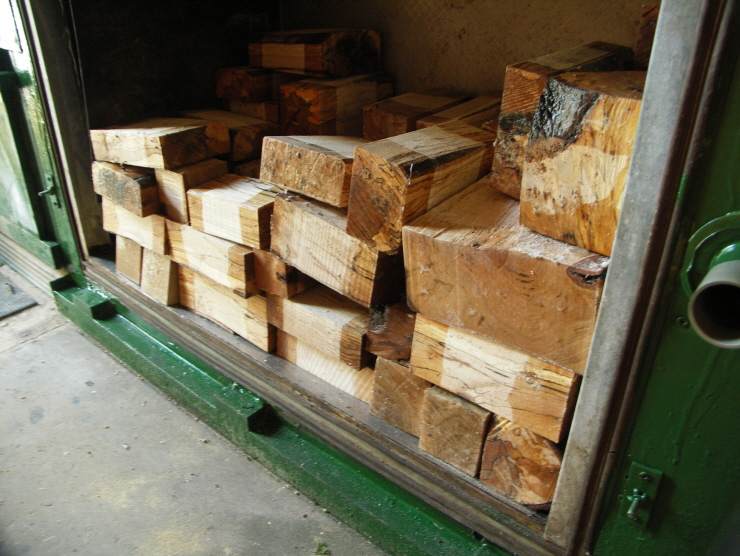
When Stacking Timber into the Kiln I use an open formation, as I am often Drying odd shapes of Timber, "Sticking" is not practical and therefore I try to leave as many gaps as possible to give the Air every chance of circulating around and over the Timber.
Wiring
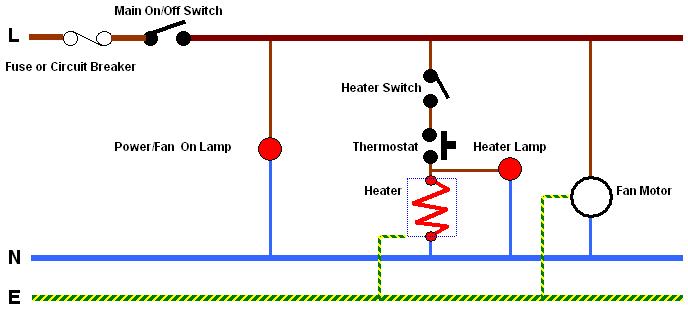
Below is the Wiring Diagram for the Kiln which is a simple Fan only or Fan + Heater via a Thermostat set up, by using a Digital Thermostat you get the benefit of a Temperature Readout and quick an accurate Temperature Setting.
The Thermostat was my largest outlay for the Kiln but was a good investment, any Heating/Plumbing/Air Conditioning Supplier will have this item in Stock.
The Control Panel can be seen in the Photo at the start of Part I of this article.
Notes.
1) Fuse or Circuit Breaker to be sufficiently
sized to suit Power of components.
2) My Kiln was rated at 120 Watts for the
Heater plus 24 Watts for the Motor, so I fitted a 3 Amp Fuse.
3) Main Switch is for isolating Kiln when
not in use or Loading/Unloading.
4) Fan has no direct on/off switch to ensure the Heater cannot operate without
the Fan Running.
5) All Wiring is in 1.5mm² Cable.
6) All Wiring and Connections inside the Kiln must be suitable for a Humid
Atmosphere and therefore must be Waterproof.
7) Indicator Lamps are optional.
8) Ensure all items are correctly Earthed.
9) If in doubt consult a Qualified Electrician.
As I said at the start I have been using this Kiln for 8 years now and in that time have probably had over 30 loads of mixed Timber through the Kiln, with each load approximately 100 Blanks, Logs, Slabs etc of differing sizes and often of mixed Species, the picture above shows Spalted Beech, Oak, Hawthorn and some Lime before being topped up with a load of Lilac Branch Wood.
Generally I start the Kiln at 30°C [85°F] and raise it by 2°C every 4/5 days until I reach 50°C [120°F] which equates to 3 Months in the Kiln, this appears to be working for my particular needs and I am achieving 90/95% success rate on a regular bassis.
![]() Part I ~ The Chamber
Part I ~ The Chamber
|
|
|
LaymarCrafts Woodturning is the Web
Site of Richard & Sheila Stapley Last update 06 May 2008
|
|
Web Site Design & Construction by Richard Stapley. |