| LaymarCrafts Woodturning | Hints & Tips |
| A Wood Drying Kiln |
Part I, The Kiln Chamber
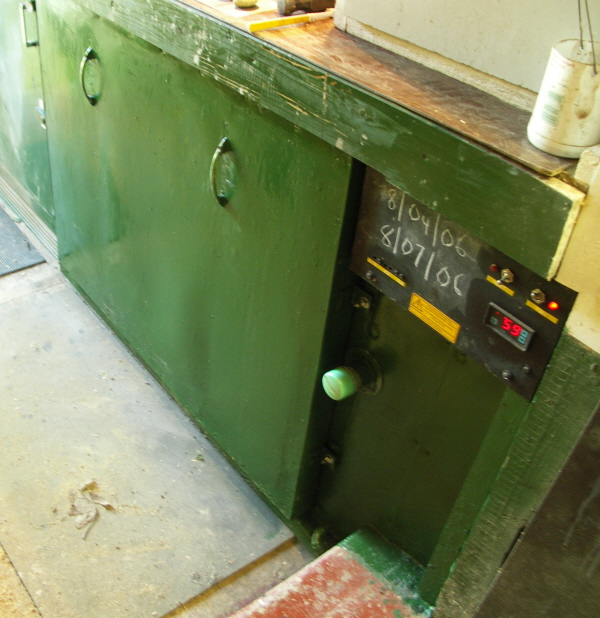
The Picture below shows my Kiln that I built 8 years ago and has been in constant use since, apart from the odd running repair it has served me well, I have Dried most types of Wood, that I get locally, with I would say something like a 90 to 95% success rate.
In part one I describe how I made the basic Chamber and in part two how I fitted it out with the necessary Fan and Heater, the principles I have used should be adaptable to most circumstances and the materials you have available.
For many years I had toyed with the idea of making my own Wood Drying Kiln but was deterred by the mystery that many Articles and News Group Threads on Wood Drying created, it was almost a case of, to coin a phrase from various TV programs, “Don’t Try this at Home”.
"Wow" this was not your normal Garden Pear Tree, the Trunk was all of 3m [10ft] long by at least ½m [20"] diameter plus endless Branches up to 200mm [8"] diameter, and in fact it took 15 journeys over 2 days to gather all this timber.
Forgetting about all the negative vibes about drying it at home I decided to build a Kiln of my own, quickly before the Lawn and the Wife put the pressure on, based on the principle that the Wood had been obtained virtually free of charge and therefore I could afford to experiment a little without to many repercussions.
So where do you go to find out how to Build a Kiln and then use it to Dry Wood? My local Library did not have the Book to answer this question, some Articles from various Magazines I had saved gave me a basic insight [typically the Old Fridge and a Light Bulb Scenario] but my most successful source was the Internet.
Two three hour sessions well into the night produced over 50 articles relating to Kilns and Wood Drying, much of this was for the larger scale Dryer but I was confident that I could adapt the relevant factors and scale them down to suit my own size of Kiln.
My first decision was where to put the Kiln, outside was a possibility, but it would mean pinching more of the Flower Beds and I soon decided this was not an advisable option, my second option was to build it in the Workshop under a work area currently housing a number of Storage Boxes containing all sorts of odds and ends [Rubbish mainly].
A good ruthless clear out reduced this mass of "rubbish" to a single box, which I now had to find a new home for, the cleared space left me with a usable area of 1.2m x 0.54m x 0.9m high, best described as space under a table open on three sides.
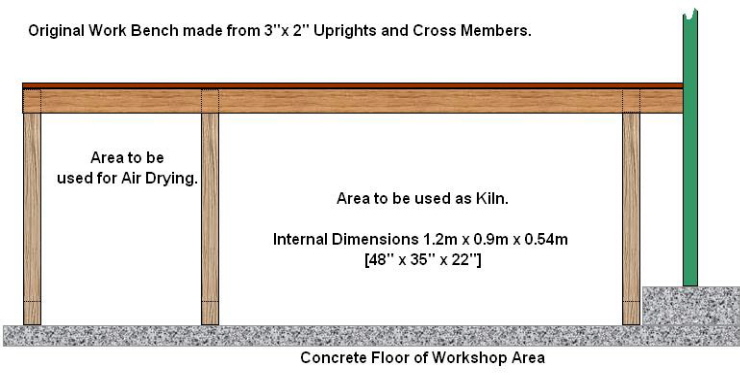
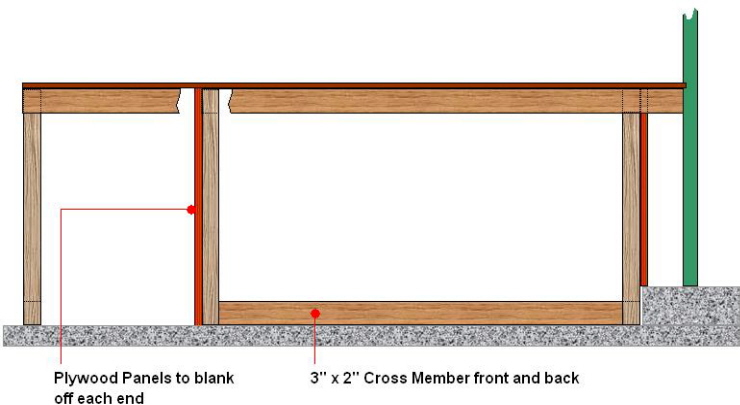
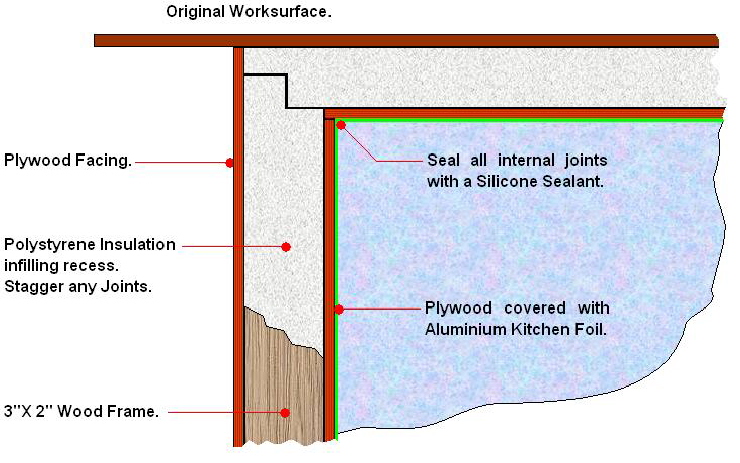
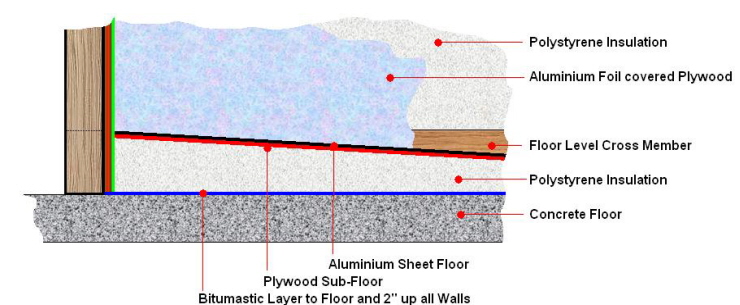
At each corner of the area was a vertical support, for the work surface, each from 3”x 2”, the two ends were closed off using off cuts of plywood, and the resulting space filled with Polystyrene Insulation, the rear of the area was against an outside wall of the Workshop and this was also lined with Polystyrene Insulation.
The top of the Kiln had a 3” recess that was filled using Polystyrene, once the three Walls and the Top of the Kiln are Insulated they need to be Lined, this serves two purposes, 1, it will protect the Insulation from Damage and 2, it will enable you to form a Sealed Vapor Barrier which is essential to prevent Moisture getting into the Insulation.
I used Plywood covered with Aluminum Foil [Kitchen Foil] which was stuck on using Spray on Carpet Adhesive, make sure you wrap the foil round the edges, I then stuck the Plywood/Foil Panel to the inside Insulated surfaces of the Kiln using a suitable Adhesive for the Polystyrene.
The above is an economical solution but any Impervious Moisture Proof Material would be acceptable, i.e. Plastic, Aluminum, Laminates etc. etc.
Once all the Panels are fitted you then need to Seal all the joints with a good quality Silicon Sealant , not forgetting the joint between the Panels and the Floor.
This now left the floor, which was to sit on the concrete floor of the Workshop, I realised that this would require a slope for drainage purposes during drying and decided to again insulate with Polystyrene and at the same time forming a slope.
Before I insulated the floor I fixed the second of the 3” x 2” between the two uprights at the front to form the eventual Access Opening to the Kiln, I then sealed the floor area and a 2” band around the bottom of the Walls using a Damp Proof Liquid Membrane type Paint.
When this was dry I then proceeded to insulate the base and at the same time forming a slope of 1” towards one end with a Drain Gully to take away the removed Water from the Drying Process.
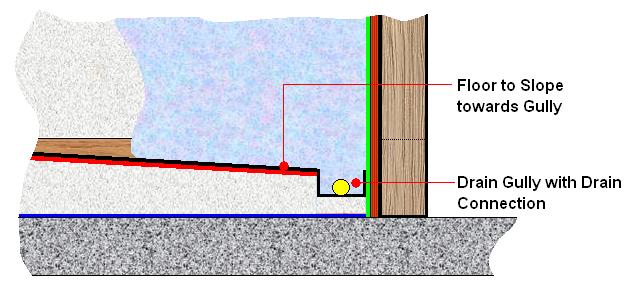
The Drain Gully was fitted with a 22mm Ø Pipe at one end to the outside of the Chamber where it was run to waste using Plastic Hose.
For the Floor covering I again used some Plywood but this time covered it with an Aluminum Sheet as this would need to support the Wood to be Dried in the Kiln, again seal all joints with Silicon Sealant as this Area gets very Wet.
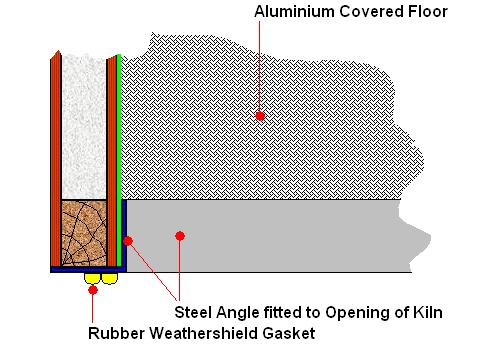
To seal and protect the Edges of the Door Opening I used some 3" x 3" Sheet Steel Angle which was screwed in place with plenty of Silicon Sealant applied between the Angle and the Insulated Envelope.
I then formed a Door Seal all the way around the outside face of the Kiln Opening by using Rubber Weathershield type Draught Excluder which is self adhesive and therefore adhered nicely to the Steel.
I now had an enclosure fully Insulated on three sides, the top and the floor, all that I now needed was a Door, I decided on a Plug Type Door as there was no space for a Hinged Door to open into.
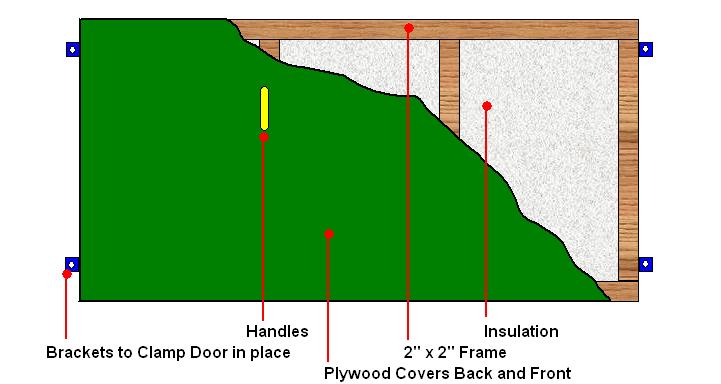
The Door was made from a 2" x 2" frame filled with Insulation and then covered with Plywood front and back, again the internal face was covered with the Aluminum Foil to form the Vapor Barrier, and as I had no suitable Angle left to protect the Edges I used Aluminum Ducting Tape to form the seal around the edge.
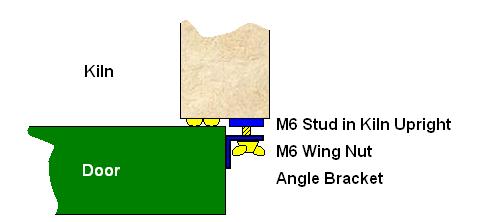
I attached four Angle Brackets that would act as the Door Locating/Clamping Mechanism and also a couple of Handles to make lifting the Door on and off that much easier.
This completed the basic Chamber that would become my Kiln in Part II I detail how I fitted the Fan and Heater to give good Air Circulation and also the method of Control.
![]() Part II ~ The Fans and Heaters
Part II ~ The Fans and Heaters
|
|
|
LaymarCrafts Woodturning is the Web
Site of Richard & Sheila Stapley Last update 06 May 2008
|
|
Web Site Design & Construction by Richard Stapley. |