|
|
| LaymarCrafts Woodturning | Hints & Tips |
| Vacuum Chuck System Pt. II |
As previously mentioned my initial Vacuum Chuck was the 3½" Oneway Drum Chuck, which is a precision piece of Engineering but I was confident that my requirement for other sizes of Chuck could easily be made from basic materials.
I had a couple of old Backplates for my normal Chuck System and these were ideal material to base my alternative Vacuum Chucks on, plus I had some M33 Nuts that fitted my Lathe Spindle and these were made into basic Faceplates.
I decided that I would use both the Chuck Backplates and Shop Made Faceplates as permanent bases for various Chucks I required, 4", 6" and 8" Cup Chucks [Inside Diameter as opposed to the Oneway which are the Outside Diameter] plus a 10" Flat Chuck for large Bowls/Platters.
The beauty of making your own is you can adapt the Size to your exact needs and requirements which will change as you progress with finding the many uses you can put a Vacuum Chucking System to.
Basic Design Concept
For the main body of the Chucks I used MDF cut into Discs of the appropriate size [allowing for a finished wall thickness of approximately 12 to 18mm [½" to ¾"]] glued together to form a laminated block to a depth of 75mm to 100mm [3" to 4"].
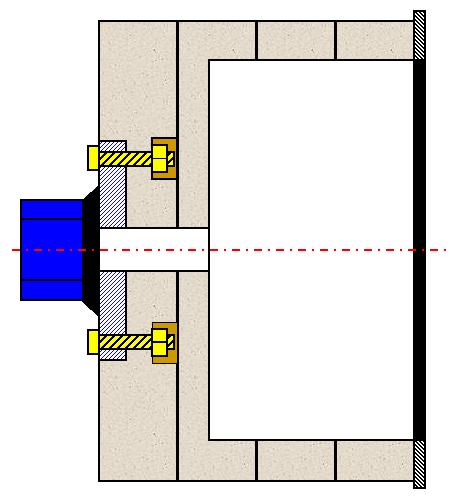
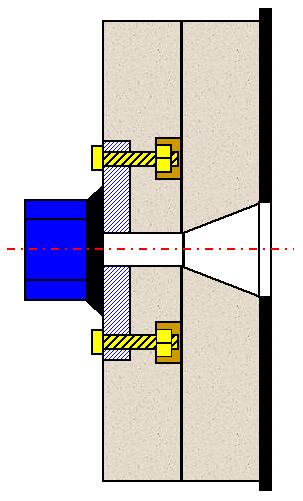
For the Chucks where I used the Backplates I simply screwed them to the MDF after the laminating process, but for the Chucks where I used the Shop Built Faceplates I prepared the first piece of MDF by forming a recess and Bolting the Faceplate in position before laminating to the other discs of MDF as shown in the pictures below.
|
|
|
As a safeguard against any Leakage I applied a liberal layer of Silicon Mastic around the Fixing Bolts and into the recess before fitting the Faceplate, this was not a problem as I always intended to make the assemblies permanent, but if you intend to use only one Backplate/Faceplate then you will have to experiment to see if there is any leakage across the joints.
Once the Glued Assembly is ready, I used Gorilla Glue and left them Clamped up for 48 hours, you can mount the Chuck onto the Lathe and carefully turn to your required size, being careful not to penetrate the very bottom layer and therefore avoid the Bolts and also not to make the Chuck Walls too thin.
I put a radius on the Leading edge of the Cup Chucks and chamfered the Flat Chuck and after sanding smooth gave each Chuck several coats of Varnish to Seal and Protect them.
For the Gaskets I have used both Mouse Mat Rubber and the Rubber from Tyre Inner Tubes picked up from the local Kwik Fit Tyre Bay [for free] this is basically cut to shape and stuck in place with Contact Adhesive, once dry and firmly attached I found by turning the Chuck slowly on the Lathe I could Trim the Rubber Gaskets to a neat finish and cut the hole in the center of the Flat Chuck using the Point of a Skew Chisel or a Sharp Knife.
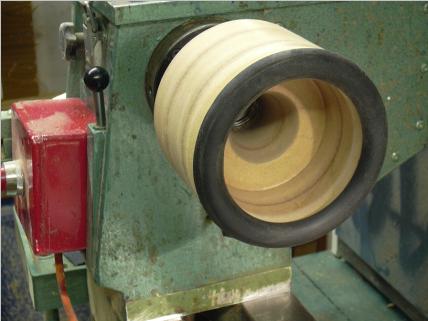 |
The
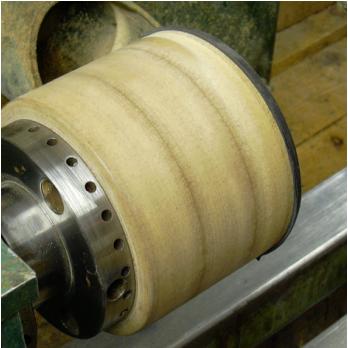
medium sized Cup Chuck I made has had perhaps the most use.
You can clearly see the depth to which the Chuck is bored, well above the top of the first layer to avoid exposing the Fixing Screws. The Rubber Gasket is from an old Car Tyre Inner Tube and works very well and is the original one I fitted and has out lasted the Mouse Mat Rubber used on my other Chuck. With this type of Gasket you will have to apply more pressure to get the seal to make when applying the Vacuum but it is very effective. The
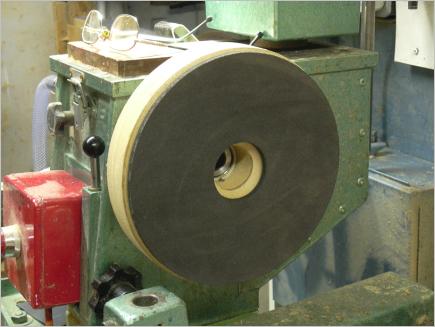
Flat Chuck used for Large Bowls and Platters has the base of a Mouse Mat for
the Sealing Gasket. |
|
|
Above is a rear view of the Cup Chuck showing the old Chuck Backplate I used, this Chuck is constructed from three layers of 25mm [1"] MDF as clearly shown by the Glue Lines.
![]() Return to Part I of this Article.
Return to Part I of this Article.
|
|
|
LaymarCrafts Woodturning is the Web
Site of Richard & Sheila Stapley Last update 06 May 2008
|
|
Web Site Design & Construction by Richard Stapley. |