
| LaymarCrafts Woodturning | Hints & Tips |
| Lathe Support and Added Bulk |
Hobby or Commercial Lathes are generally constructed with one of three designs of Bed Bar, i.e. Hollow Bars (Round or Box Section Steel), Solid (Cast Iron or Steel) and Fabricated (Steel Sections), Hollow Bars generally tend to lead to a lighter construction but with sufficient stability, however this can lead in turn to vibration, noise and reverberation under certain conditions.
Most Lathe Operator Manual's have a recommendation that the Lathe should be mounted on a Solid Support with additional Weight Added if possible, and I have seen recommendations in various Magazines suggesting the use of Breeze Blocks, Bags of Sand, Lifters Weights all used to add Bulk, but this is only half the story.
The solutions explained here are really only suitable for Hollow Section Bed Bars (Square, Rectangular or Round) and a Lathe Main Support that is also Hollow although this does not necessarily have to be of Steel it will have to be Leak Proof, as you will appreciate as you read on.
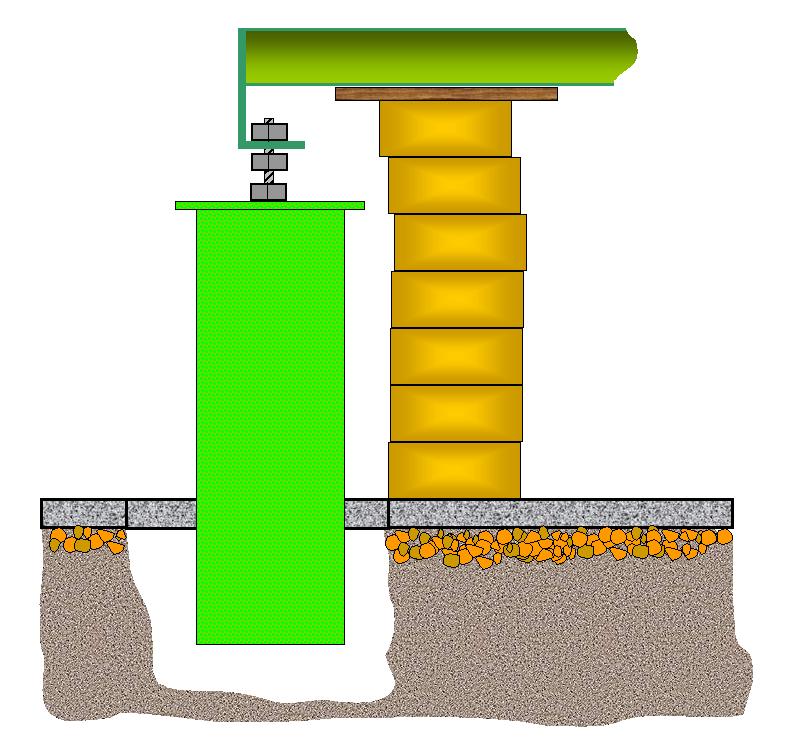
As already mentioned good sound support is essential for any Lathe and if this can be fixed to or into a solid Floor all the better, I acquired two lengths of 300mm diameter Pipe from a Factory that was being demolished and for the price of a few drinks had a plate welded to one end of each of the pipes.
If you intend Fixing the Supports to the Floor, as opposed to Sinking and Cementing them into a Concrete Floor, then you will require a suitable plate welded onto each end of the Pipe and the bottom plate should have an access hole to enable you to fit the retaining Screwed Rod for the Lathe.
The fixing arrangement for this is shown below, this is not dimensioned as every situation will be different, however you will need to work out exactly what your requirements will be before you get to the Cutting and Welding Stage as this will be too big for the Hacksaw at Home, although any height discrepancies can be taken up by the Oak (or any suitable Hardwood) Block I recommend as Packing.
This Oak Block has a number of distinct advantages over Bolting the Lathe direct to the Top Plate of the Supports, (1) it will act as Sound Proofing Barrier, (2) it enables you to adjust the Height of the Lathe to suit your preferred Working Position and (3) any adjustment required to Level the Lathe can be done by trimming the Block to suit.
Two of these supports were made and the final arrangement with the Lathe fitted is shown below, the Steel Top Plate is wider than the Pipe as I envisaged that at a later date I may be able to utilise this for perhaps an Outboard Turning Rest support.
First I carefully marked out the position of the two fixing holes required for the M12 Screwed Rod to which the lathe would be eventually fixed, once these were drilled I then threaded the Rod through the hole and with a M12 Nut each side of the top plate tightened the assembly up, adding a couple of drops of Thread Lock for good measure.
You also require a Hole to allow for the Sand to be poured into the support pillar once it is cemented in place, I drilled a Hole of 15mm Ø.
I sunk these into holes I had chiseled out through the 3" concrete floor of the workshop and excavated down to a depth of 450mm (18") and cemented them in place making sure they were level in all directions.
The method I used here was to build a pile of bricks adjacent to the excavated holes onto which I would rest the Lathe at the correct height, then with the two Supports in place I attached the Lathe loosely via the Screwed Rod with the Bricks supporting the Lathe as shown below.
By using a Spirit level and packing you can then get the Lathe Bed Level and then by using the top M12 Fixing Nut, raise or lower the height of either end of the Supports to suit.
You should now be able to mix and pour the cement to fill the excavated hole in the knowledge that the Lathe will be Level and providing you leave the Cement to cure for 3 or 4 days it should stay that way.
After a further couple of days to ensure everything was ok I removed the packing material and remounted the Lathe Bed and filled each Pillar with Kiln Dried Sand and Oil [Mineral Oil is preferable for Environmental Purposes or as one person has done use Washing Up Liquid, in fact any Fluid that will not Corrode, that will bind the Sand is usable] once full I sealed the Hole with a Plastic Blind Grommet.
I then assembled the Lathe for use and tested it as hard as I dared to see how well it stood up to an unbalanced log, impressed was my immediate reaction.
Some time later it occurred to me that
the Lathe Bed also being hollow would benefit from the same Sand treatment and I
again stripped the Lathe and removed it from the supports.
|
|
I started by drilling a hole in the end plate, at the Tailstock end,, that forms the support for the Lathe Bed, at the centre of each of the Bed Tubes, this hole was just larger enough to take the spout of a small funnel. I have found that the best Sand to use is Kiln Dried, which is readily available from any Builders Merchant, this Sand being totally dry is pour able, in fact it flows like water. It is worth noting that it flows so freely that any damage to the bag it comes in can mean you having a boot [trunk] full of Sand before you can get it home or by the time you've carried it to the Shed it is half empty, and any Gaps in the Lathe Bed or Supports will also freely allow the Sand to flow out, be warned. I used a Plastic Measuring Jug to pour the Sand into the Lathe Bed via the Funnel and after every Jug full I added ½ a Jug of Oil or suitable Fluid, it is advisable to use a different Jug & Funnel for the Oil. When the Bars were full, I left them to stand for a couple of days to ensure the Sand/Oil had time to settle, topping up any short fall before proceeding on. You will then need to seal the hole, some Epoxy (Typically Araldite) worked for me. It is worth checking before you do any of this that the welding where the Bed Support is fixed to the Bed Bars is sound, as I found that these joints were only stitch welded and after a few weeks I had Oil seeping out of the joint. I had to clean of the Oil and apply some quick setting mastic to seal the gaps, this operation would have been much easier if I had checked before I started.
The finished set up, although the picture is a little distorted due to the Wide Angle Lens of the Camera, the Lathe is Level in both directions. |

You can also apply the principle to a Pillar
Drill and some Bandsaws, although you will have to close off any openings where
the Sand / Oil could escape from.
q
Respirator Storage
I use a Racal Respirator all the time (well nearly all the time) and being the shape it is and the fact that it is top heavy at one end, this makes it awkward to put to one side when you need to take it off and put it down for whatever purpose (a cup of tea for instance).
To overcome this I fixed a shelf below two of the Roof Beams in the Workshop, the Respirator sits on this shelf and because the shelf has a natural slope, due to the slope of the Roof, the Respirator falls towards the back of the shelf but is stopped by the Head Strap from falling right through.
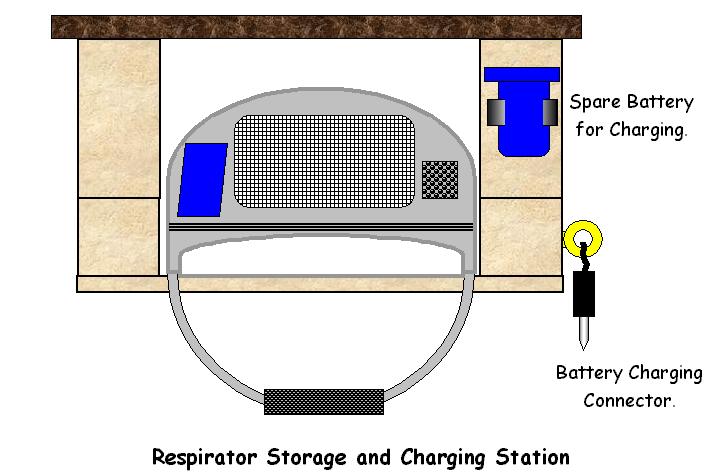
The illustration above shows the principle, as the Beam's of my Workshop Roof were not deep enough I had to pack them out to gain the height needed for the Respirator, otherwise the construction is straight forward.
To the right of the Respirator I have fitted a Plastic Clip into which I clip the Spare Battery and when it is necessary to recharge it the recharging plug is hanging, close by, from the Eye screwed into the Beam.
The Charger Unit is plugged into a dedicated
Switched Socket that is fitted with a Timer, this prevents over charging and
being a bit of an Electrician I have also wired in a warning Light that flashes
on and off when Charging is completed, it looks good but is really an
unnecessary luxury.
|
|
|
LaymarCrafts Woodturning is the Web
Site of Richard & Sheila Stapley Last update 19 July 2007
|
|
Web Site Design & Construction by Richard Stapley. |
