| LaymarCrafts Woodturning | Hints & Tips |
| Abrasives |
Cutting
Modern Abrasives are expensive but due to their superior performance are good value for money, I purchase my preferred Abrasives in bulk as this significantly cuts the overall cost, once you have made the initial investment.
I found that by preparing Abrasives ahead of usage, rather than just ripping of a strip as and when required, I not only controlled the quantity and quality, but reduced unnecessary wastage in the process.
I use a medium weight cloth backed Aluminum Oxide Abrasive that I purchase in 50m Rolls, in 120g, 180g, 240g and 320g although I must admit I also have a roll of 80g, but then who doesn't (only those that write the Books I guess).
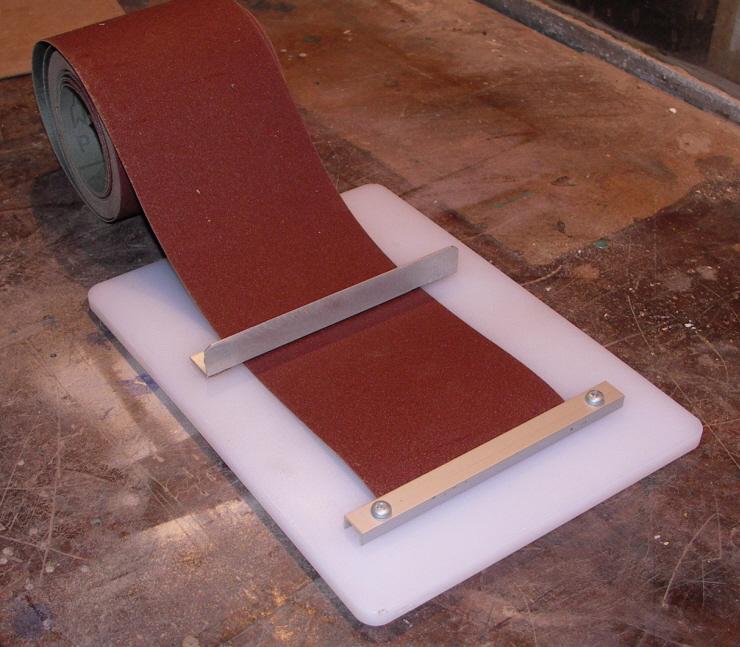
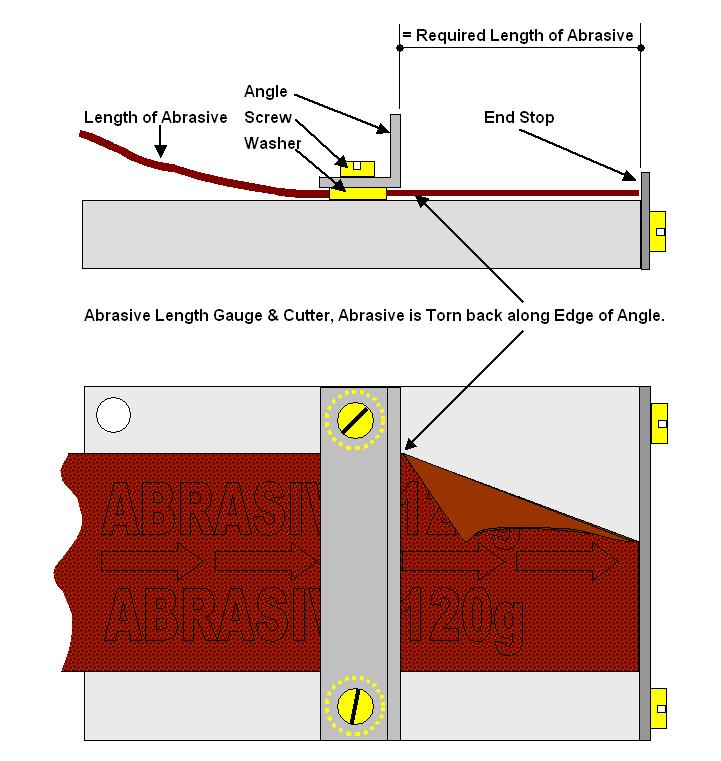
The Abrasive is 115mm Wide and I use it in 100mm Lengths (that's 500 pieces per roll) which I use folded 3 times for comfort and fewer burnt fingers, to make it easy to cut up a working batch, usually 20 pieces, of each grade I devised this simple jig.
The principle is the same as that for tearing paper using a rule, i.e. you tear against the straight edge of the rule placed on the paper. The problem with Abrasives is that they are just that, Abrasive, and Knives, Scissors or a Steel Rule will not last very long under these conditions.
I started with a Baseboard of 155mm (see next paragraph) x 250mm cut from one of the Nylon Type Chopping Boards that you get in any Kitchen Ware Store, the reason I chose this was firstly we had a spare one, and secondly I soon learnt that they are very durable. However any suitable material can be used, my first attempt used a Hardwood Base which served me well.
You now need to find two M6 washers (spacers) which are slightly thicker than the Abrasive you choose, but not too thin that feeding the abrasive under the Angle becomes to difficult. If you have any difficulty finding the correct Washer you can Turn two from either, Aluminum, Nylon or even Hardwood (Box is an ideal Wood for this)
I then cut a piece of 25mm Aluminum Angle 155mm long (the required length must be the width of the Abrasive you use + 2 x the diameter of the Spacing Washers +20mm) and drilled two 6.2mm holes at a centre distance equal to 115mm (i.e. Width of Abrasive) + the Diameter of the spacing washer (one only) + 5mm clearance.
I then drilled holes in the baseboard at identical centers to those in the Angle (use the Angle as a Template), these holes were 5mm for tapping (one benefit with using Nylon it will take a good thread) to suit the M6 Screws used.
These holes need to be at a distance from the end of the board, where the stop bar will be fixed, to suit the required length of Abrasive you wish to use, in my case this was 100mm + ½ the width of the Angle i.e. 112.5mm. (100 + 25/2). The Angle complete with the Spacers (Washers) can now be Screwed to the Baseboard.
On the end of the Baseboard you need to make a stop to measure the length of the abrasive you wish to cut. I Screwed a length of 25mm Aluminum to the end of the Baseboard, alternatively you could Screw a piece of Wood, Nylon or Angle to the surface of the Baseboard.
To use you simply thread the Abrasive (Abrasive Side Down) through the gap between the Angle and the Baseboard up to the stop, then a sharp tear against the Angle is all that is needed, then feed through the next length and repeat, this will give you a constant length of Abrasive each and every time.
I have used mine to cut an estimated 4000 pieces of Abrasive and there is very little sign of any wear on the Angle and other parts that come in contact with it.
|
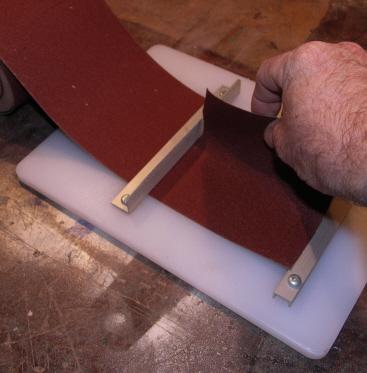
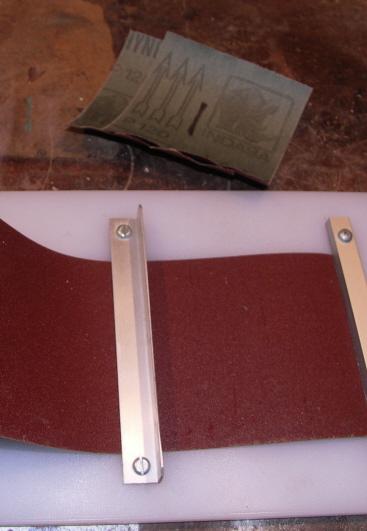
These pictures show a later version of the "Cutter" made from a small "Plastic" Cutting Board. The "Tearing" action used to cut the Abrasives to length, and right ready to go again with two lengths already done and marked "1" for the 120G Abrasive type can also be seen above. |
|
Identifying
A
|
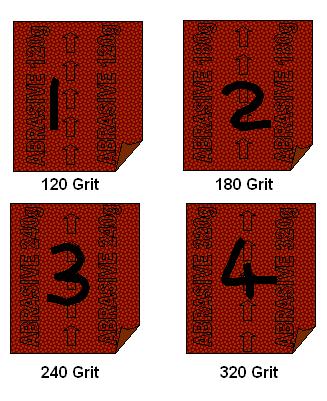
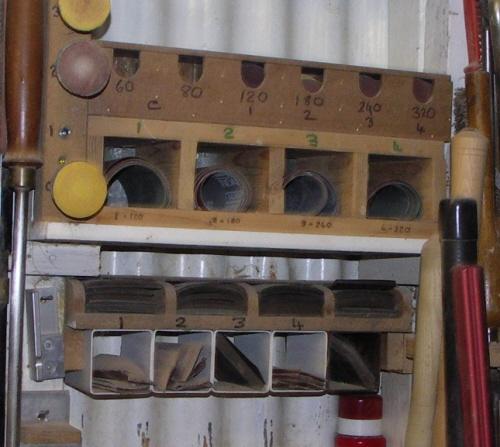
Having now cut a supply of Abrasive you will realise that not every piece has the Grit Size on the back and that each different Grit is also the same colour (I'm not a believer in the theory of using a different make and colour for each Grit Size). The simplest solution is to mark the back with a Felt Tip Pen (Black is definitely best) but you do not need to go to 3 digits. i.e. 120, 240 etc. A simple Code is all you need, I use 1, 2, 3 & 4 you could easily use ABC or what ever you prefer, cross reference this with the Grit Size (important for those with a short memory). So as not to highlight the fact that I have a stock of 80 Grit Abrasive this has no coding, no number therefore must be 80g. By marking in this way a simple look at the back of any piece, if you are not sure what Grit you are about to use, is all that is needed, I find the marking never wears off or disappears. |
|
Storage
Having now produced something like 40 to 80 pieces of Abrasive you now need to keep it neat and tidy for when you want to select a new piece for use.
This is my solution, a series of small Pigeon
Holes approximately 50mm to 100 mm wide x 100 mm deep and say 80 mm high will
do. The Width determines whether the Abrasive sits Flat or not in the Pigeon
Hole.
A simple plywood/MDF box laid on its
side with dividers spaced to suit and an area that you can mark with your chosen
coding system (Letter / N°) and corresponding Grit Size. Then all you need to
do is find a suitable location, mine is fitted between the rafters of the shed,
which means it is out of the way but still accessible when required.
 |
I in fact have two, the second
one to store the Wet & Dry I use for de-nibbing and the infamous 80g plus
some pieces of 600g that I occasionally use.
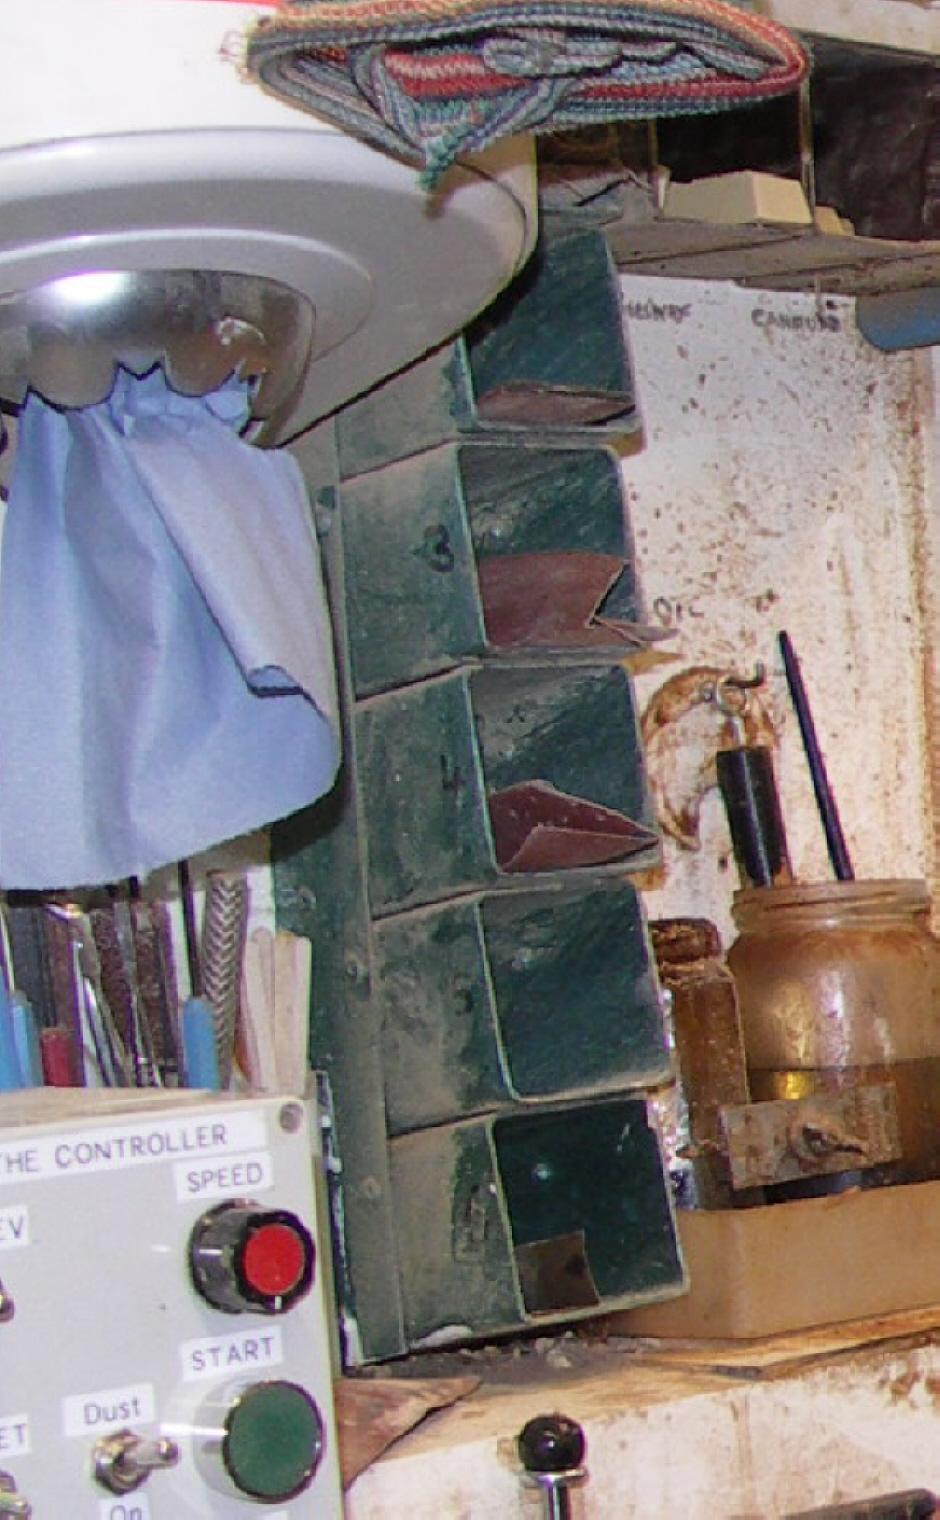
Here you can see the various Storage Pigeon Holes for different forms of Abrasives I use. At the Top is a series of compartments for 2" Discs used with the Rubber/Velcro Power Sanders which sit in a vertical rack just to the left. Next we have the 4 pigeon holes for the Cut Abrasives Grade 120G to 320G. Below this is another series of pigeon holes which house the 400G Wet & Dry I use for finishing. And finally below this is a set of 4 pigeon holes made from 2½" Square Plastic Drain Pipe in which I store Reclaimed Abrasives and some 600G Wet & Dry. |
Abrasive always available to Hand
With this system the objective is to have only one piece of Abrasive of each grade in use at a time, so you also need a place to put these pieces that are in current use, amongst the shavings is not a good idea, on the Lathe Headstock should not be a consideration, my solution is more Pigeon Holes, but with a difference.
I made a Vertical Stack with the Pigeon Holes at an angle, this would allow for easy access and at the same time the Dust carried on the Abrasives would fall away.
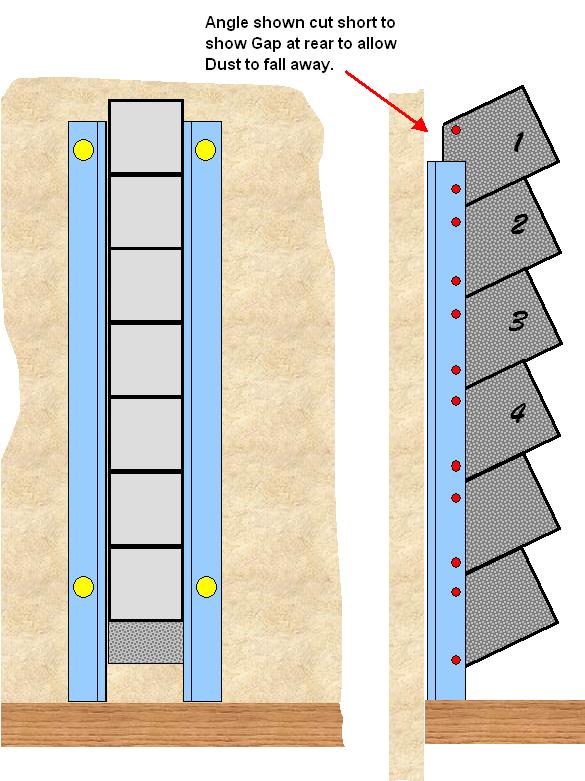
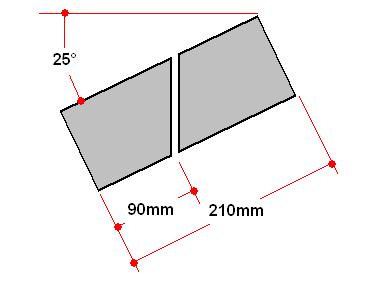
| I started with a
1m length of 65 mm Square
Plastic Rainwater Pipe and cut from this 3 lengths each 210 mm long and then
cut this in two at an angle of 25° as shown in the sketch to the right.
These were then Glued one on top of the other (as shown above) using the Glue that you get for Plastic Piping, it is advisable to rub the surfaces, to be stuck, with some Abrasive to get rid of the oily surface finish that this material appears to have. For Cutting the Pipe I used the Bandsaw with the Mitre Guide for accuracy. When Gluing the pieces together I used a flat surface onto which I placed the Angled End of the Pipe, this will ensure that the correct position of all six pieces. |
|
|
Once the Glue is set you can then attach the vertical angles (25mm x 25mm Aluminum or Plastic is suitable) down each side of the assembly using pop rivets to fix the Angle to the Tubes. It is advisable that there is a small gap at the rear of the assembly to allow the inevitable dust that will occur to fall away. One problem that I found was that this type of Tubing is prone to Static and as we all know Dust and Static are not an ideal combination. I found that by painting the unit (I used Hammerite) this overcame the problem. The whole assembly is then simply screwed to the wall, leaving enough space below to allow you to clear away the Dust. All that you now need to do is mark each pigeon hole with the code you choose, I simply used a Felt Tip Pen adding 1 to 4 to the side of the first 4 holes. I can almost hear you asking why 6 pigeon holes! well apart from the Abrasives, I use Steel Wool or Scotch Pads and 400g Wet & Dry for De-Nibbing between applications of Melamine, so this is where they also reside.
|
 |
Wet & Dry Cut to Size
I purchase my Wet & Dry in a 50 sheet pack and cut each sheet into 9 rectangles of approximately 70mm x 75mm, below I detail one way of easily and quickly cutting these 50 sheets into this handy size.
I simply keep the 50 sheets together and set the Guide Fence on the Bandsaw to 70mm and proceed to cut 3 strips of the Wet & Dry, then reset the guide fence to 75mm and cut each of these strips into 3 again. I cut with the Abrasive face down as this does not appear to dull the Bandsaw Blade, however I do normally carry out this cutting when a Blade is at the end of its useful life.

Cutting 50 Sheets of Wet & Dry with the Bandsaw
I now have 450 pieces of 400g Wet
& Dry that are all of the same size, easy to Store with no Wastage and ready
for use.
|
|
|
LaymarCrafts Woodturning is the Web
Site of Richard & Sheila Stapley Last update 19 July 2007
|
|
Web Site Design & Construction by Richard Stapley. |