| LaymarCrafts
Woodturning |
Hints
& Tips |
| Abrasive Systems for Hollow Forms
and Vessels. |
In a previous article I described
a series of Aids allowing me to Sand finish the inside of Hollow Forms and Pots,
although these simple items have served me well I have over the last few months
expanded my turning of Hollow Forms and found I needed a more efficient method
of Sanding .
I was at an event where I saw a
Carver using all manner of "Flapper Wheels" to finish his work and
this set me thinking on ways and means of adopting such an idea for use with my
hollowing requirements.
A quick troll of the Internet
found that there were such items out there but as these were quite expensive,
especially if I was to cover all my perceived needs, and many of these were not necessarily
Flexible enough for entering into a Hollow Form or were limited in Size, my first designs were a
variation of the Commercial Wheels that were available and have expanded into
more efficient and flexible designs.
The Wheels that I have seen,
include the Metalworkers Flapper Wheels which are very stiff and not easy to adapt
for Wood, Star Wheels and Sanding Mops which are basically strips of Abrasive on
a Mandrel and Radial Bristle Discs which are high tech Abrasive Wheels favoured
by Woodcarvers for intricate detail Sanding.
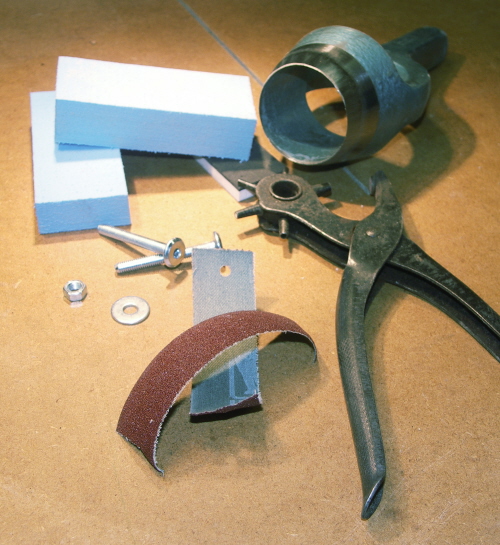
| Typically what
you will require to produce these Sanding Aids is shown in the picture right.
Screws I have used 50 mm x M6 Cross
Dowel Screws [2" x ¼"] or you could use Roofing Screws, the
type with a domed head, I chose this type of screw as a normal hexagon
headed screw has the potential to score the bottom of the Vessel when
sanding.
For some of the Wheels/Pads I have cut
the screws to a shorter length to enable me to construct the item and
for others you may require longer screws.
Nuts and oversize Washers to suit.
Strips and Off Cuts of Cloth backed Abrasives in the
various Grit types you normally use.
High density Foam.
Wadding Punches can save a lot of time
and effort and a pair of Punch Pliers are ideal for making the Holes for
the screw.
The Wadding Punch in the picture is
2" diameter and was picked up from a second hand Tool Dealer for a
few Pounds, it is used to also cut Discs for my Hook and Loop System.
You will also need some Industrial
Scissors/Shears, Adhesives, I use either Superglue or 2 part Epoxy. |
|
The first type of Flapper Wheel comprises of a series of Abrasive Strips with a central hole through which you
pass a suitable screw and then clamp the assembly together with a large washer
and nut.
| The size of
each strip can be any size you choose, length and width, depending on the size of opening
it requires to go through.
The ones in the picture are approximately
60 mm x 12mm [2½" x ½"] and you can have as many strips as
you feel necessary, the more you use the less flexible the pad becomes,
although it is very simple to add or remove strips at any time.
You can also increase the flexibility
by having narrower strips or by
placing a spacer between every 3rd or 4th strip, for this I use shop made leather
washers, cut from an old belt, but any flexible material would be
suitable,
i.e. rubber.
The bolts I use are M6 x 50mm Cross
Dowel Screws which are used in Flat Pack Furniture, these have a flat
head, they can be cut to a shorter length when necessary.
a
|

|
 |
To make the hole in the strip you can
either drill them by bunching the strips together and drill through,
from the non abrasive side or use a hand operated wadding punch.
Although in the picture I have used a shop
made knurled nut I also have a number of these pads with just an
oversized washer and standard nut.
I stamp either the knurled nut with a
number code that corresponds to the Grit of the Abrasive, in the picture
above you can just make out the number "2" for 180g Abrasive,
alternatively you can use a centre punch to do a series of Dots to
indicate the Grit Size.
Once these have been used a couple of
times you will find it difficult to determine what the Grit Size is so
marking them now is a good thing.
I have made a couple of mandrels into
which these pads can be screwed, this enables me to reach into the item being
sanded and also prevents the screws from getting damaged as would occur
if mounting
straight into a Drill Chuck.
Details of these mandrels are given
later in this article. |
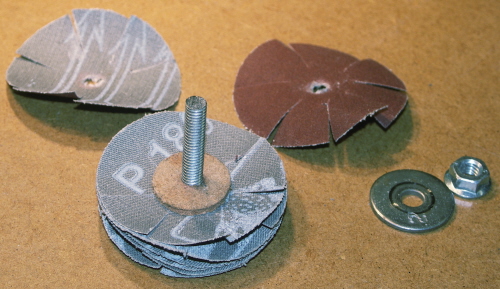
| The
second version of the Flapper Wheel are made from 2" Discs
,or larger, of
Abrasive with a central hole to take the screw and then cut as shown.
These are more flexible and by varying
the number of Discs you can get these Wheels through relatively small
openings.

I have used a 2"
Wadding Punch to cut the Discs, although any size is practical and you can
vary the diameter to suit your needs.
In the centre of the Disc I
have a 6mm Hole and then I cut, with Scissors, a series of radial cuts
towards the centre of the Disc, the more cuts the more flexible the Wheel.
I use between 6 and 8 cuts,
and also incorporate a leather spacer every couple of Discs again to
improve the flexibility.
To enable me to identify the
Abrasives Grit Size I have stamped the washer with the corresponding
code number, i.e. 1 = 120g, 2 = 180g, 3 =240g etc. etc. |

|
The above Wheels will adequately
handle the Sanding of the inside walls of Vessels, Pots and Hollow Forms but are
limited when it comes to sanding the bottom of the item, for this operation I
have adopted a slightly different design.
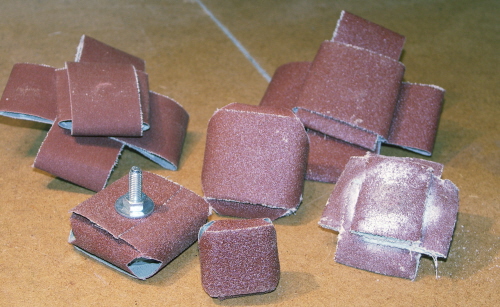
The Abrasives require to be cut into
suitable lengths and widths and then Punched with a suitable hole as
shown, Type "A" is for the first Flapper Wheel detailed above
and the Type "B" is used for the Bottom Sanding Pads.

|
For the bottom
of the Pot or Vessel I constructed a series of Pads either with
additional "Flappers" as shown or without, the three Pads in
the centre of the picture are of this type
The three "Pads" incorporate
a Disc of High Density Foam whereas the others are constructed with
Abrasives only.

The picture above shows a Pad with the
Foam Disc insert, the Foam needs to be cut roughly round and of a
diameter to suit, this with the length of the screw will determine the
minimum length of the Abrasive and the distance between the holes.
You will need to experiment here to
ensure you can get the Abrasive onto the screw. |
I have cut a shallow recess in the
Foam to accommodate the screw head then with the screw in place you place two of
the Abrasive strips at right angles and thread them over the screw as shown.
This will form a Square Pad which
can be if required "Rounded" off by cutting the corners off after assembly.
The version with the
"Extension Flappers" are ideal for round bottom bases or the larger
base as they are more flexible and follow the contours better that the version
with the foam pad insert.
Simply follow the instructions
above, with or without the Foam Pad, and add any number of strips folded over
and locked in place.
Having now made these Wheels and
Pads you will require some form of Mandrel to hold them and at the same time
allow you to reach into the Vessel/Hollow Form, I have found that this needs to be reasonably
sized as if too thin it will flex and bend when in use.
| This is a 150mm
[6"] Mandrel and I also have a 230mm and 360mm [9" + 14"]
version, all are made from 12mm [½"] Ø Steel with a spigot at one
end to suit the capacity of the Drill Chuck.
The other end is drilled and tapped to accommodate
the size of screws you choose to use.
I have found that I have full control
over the Wheels when used with these mandrels and there is no whipping
or flexing of the shaft in use.
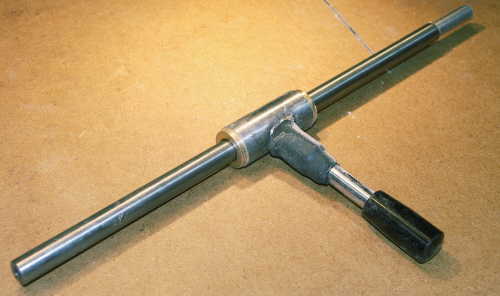
Long mandrel with sliding support
handle uses two Brass Bushes, silver soldered into a steel tube ,that
allows the Mandrel to freely turn.
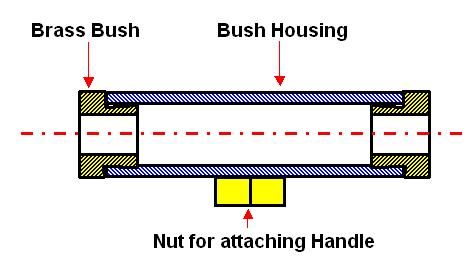
|

For the long mandrel however I did find
control was precarious at times so I added a support handle.
Basic details for the mandrels, all the
Mandrels I have are from 12mm ø [½"] with lengths to
suit your particular requirements.

With the Handle the long mandrel is
controlled from the point when it enters the Vessel/Hollow Form which is
always the most critical point.
An occasional spray with a Dry
Lubricant is all that is needed to keep it rotating freely. |
The Flapper Wheel designed for the
Metalworker is a great concept but is not flexible enough for the Woodturner so
I made my own which are flexible and retain the principle of the original.
This
type of Wheel is ideal for Sanding not only Pots and Boxes but can be used to
Sand external surfaces of Bowls and Platters etc.
| I start by
turning a Wooden Core, this can be any size, diameter and length, but
the diameter will determine the final diameter of the wheel.
Through this I drill and recess a hole
to be a tight fit for the Spindle Bolt, I again used M6 Screw so that
these Wheels could also be used with the Mandrels.
With the Core still on the Lathe I fit
a block of High Density Foam on to it using 2 part Epoxy as the
Adhesive..
Once this is set you can then turn the
Foam to its finished diameter using a Spindle Gouge and finish with
Abrasive.
I have found that you require at least
a layer of Foam of 10mm [3/8"] thick , so if the Core piece is say
20mm Ø then the Core + Foam will be 40mm Ø.
Part off the Core so it is flush with
the foam at both ends.
You now need to cut the slots that will
take the Abrasive, I have found 8 slots to be ideal and I cut these on
the Bandsaw down to the wood Core as illustrated in the Sketch.
I now cut Strips of Abrasive that I
will fold double and glue them into the slots using Thin Superglue.
These strips need to protrude from the
slot by an amount that will ensure that if bent over they will overlap
the next strip.
For the example shown, which is to the
dimensions given above, each strip is 60mm which means it actually
protrudes by 20mm and as the distance between each of the strips is 15mm
then there will be a 5mm overlap in use.
|


|
| In the first
photo of this article you would have seen blocks of the High Density
Foam that I have been using not only for items here but also to make
Pads for free hand sanding and also to renovate my old worn out 2"
rotary pad sanders used for power sanding.
This Foam I came across by chance when
my son threw out his Wave Board and as I could net get it in my Car to
take it down the Dump I cut it in half on the Bandsaw and the rest is
History as they say.
I have found that you can easily Shape
it on the Lathe with a Spindle Gouge and smooth it off with Abrasives,
it can be easily Glued to most materials with either Super Glue or 2
part Epoxy and it will also readily take Self Adhesive Velcro.
I also use it as a Wiper Pad for
cleaning of my Scribbles on the Chalk Board. |

|
Occasionally I have the need to
Fine Finish certain Items in particular Pots and Boxes, for this I have adapted
not only my system based on above but also an adaptation of the Hook and Loop
Pads
| Webrax or
Scotch Pad is a material that is developing for Woodturners and I found
I could easily attach 2" Discs, cut with my Wad Punch, to standard
or shop made Hook and Loop Pads and this allows for a finer finish on
pre polished or even post polished items.
They will attach direct to the Pad you
do not require to fix any "Loop" material to the Discs.
By putting a number of Discs on a M6
Screw Mandrel as for the items above but with the addition of a large
"Penny Washer" front and back, you also can make a useful
Final Polish Mop for all manner of turnings.
This is a lightweight material and its
life is short but still a worthwhile addition to your
Sanding/Finishing/Polishing arsenal. |
 |
Power Sanding using the above ideas will not
satisfy all of your requirements and free hand sanding will always remain a necessity.
 |
In an earlier
article I describe how I used holders for Abrasives to get into various
Vessels and Hollow Forms these have worked to a fashion but are not as
efficient as I hoped they would be, since then I have been looking at
alternatives and have finalised on this design.
The idea is to make a smaller Sanding
Head with a certain amount of flexibility built in to enable sanding of
curves and contours, something that was lacking in my original designs.
The item on the right is a Guide Roller
from an old printer this takes the form of a medium hard rubber roller
attached to a steel bar, in fact there are often more than one roller on
the bar but obviously I only need the one so the others have been
removed.
I have then stuck a length of Velcro Hook
Material around the Pad that I have formed and I can attach to this the
Abrasive of my choice as shown on the left.
The pad for the item on the left in the
picture is formed in a
slightly different way by using Foam Rubber Tape, normally used for
insulating water pipes, which is self adhesive and again applying a
final layer of Velcro Hook Material.
The Foam Tape version is more flexible
than the solid Rubber one and is better suited where you have rounded
contours inside the Vessel.
The Spindles, which are about 200mm
[8"] long fit into a suitable Handle, in my case one turned from
Mild Steel and Knurled with a hole either end into which I can slot and
fix the Spindle via a Grub Screw.
This arrangement allows me to get into
the Vessel/Hollow Form and sand any of the Walls either free hand with
the Lathe at rest or with the Lathe Running.
I have about 10 of these each a
different diameter and the degree of softness of the Rubber Pad.
|
My only problem now is to find a suitable means
of storing all of the various Wheels, Pads and Flappers I have made which must
in total be something like 40 pieces, all different shapes and sizes as well
as Grit Types.
|
LaymarCrafts Woodturning is the Web
Site of Richard & Sheila Stapley
All Content, Articles, Pictures & Diagrams as Presented are the ©
Copyright of LaymarCrafts & Richard Stapley
Last update 06 January 2010
All Rights Reserved |
|
Web Site Design & Construction by
Richard Stapley. |