|
|
| LaymarCrafts Woodturning | Hints & Tips |
| Cross Slide/Banjo Cover |
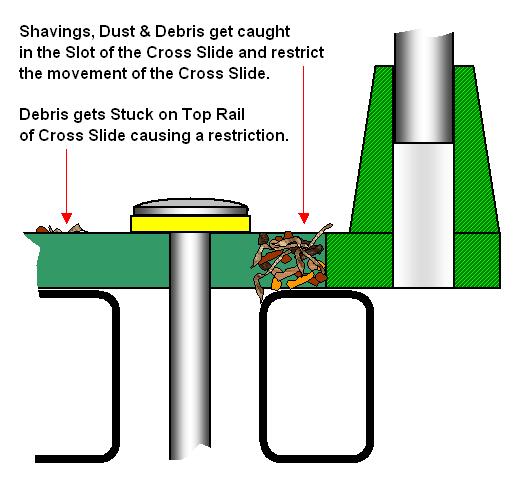
The Cross Slide [Banjo] on the Hegner Lathe I use, has what I would term an "open slot" design which is common on a number of other Lathes and therefore this idea should be adaptable to many Lathes.
One of the problems I encountered with this design, was that the slot would fill with shavings / dust and when you attempted to adjust the position of the Tool Rest the travel of the slide became restricted, requiring the debris to be cleaned out on a regular basis before any further turning could continue.
Also the action of the slide really needs to be smooth and I found that the upper surface of the slide often had deposits of Melamine / Sealer mixed with dust on it and this would prevent the washer of the locking mechanism moving freely across the surface of the slide when released and also accounted for a certain amount of wear of the washer.
Fed up with the constant cleaning I set about
finding a solution to the problem, two considerations were evident the free
movement of the Cross Slide must be maintained and any significant increase in
the height of the Cross Slide would effectively reduce the available swing over
the Bed of the Lathe.
|
|
The Slide on my Lathe is from Cast Iron and the sides are not truly square and at the widest point the width is 65mm, I therefore would require a lightweight, flexible and durable material to make a cover to fit over the slot and the central clamping bolt.
Early experiments with Cardboard and Tape soon pointed me in the right direction and a visit to the local DIY Store soon provided the material. A 2m length of 65mm square Rainwater Pipe was ideal and although I would need only 250mm for this project, I could see other uses for the pipe as you will see.
I first cut, very carefully, a 250mm length from the Pipe on the Bandsaw and then again using the Bandsaw cut it lengthways to suit the height, "A" below, I required. You need to measure the height of the slide plus the height the locking bolt extends beyond the slide + 2mm for clearance this will then determine the cutting point when making the lengthways cut. Remember the dimension calculated is applied to the inside of the Pipe, see below.
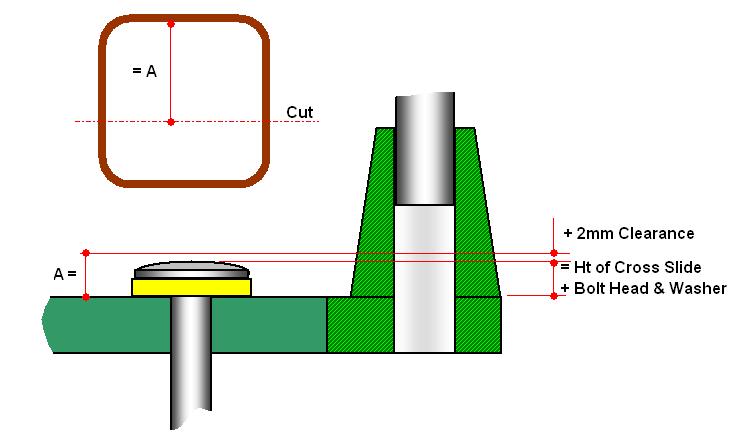
It is important to get these dimensions as accurate as possible, too little clearance between the Bolt and the Cover and it will not Slide Smoothly, too much clearance and you will reduce the "Swing" over the Slide.
One benefit that I had, which you may wish to consider, is that the locking bolt for my Lathe is of the Coach Bolt Style which has a shallow rounded head (Pan Head) and therefore you can keep dimension "A" to an absolute minimum, these are readily available in DIY and Hardware Stores and it may be a better solution to your existing Bolt.
To attach the "Cover" to the slide I used 6 screws, three either side. Mark out the position of the Holes on the Plastic Cover and carefully drill the 6 holes, then using some tape, fit the cover to the slide and mark the holes through.
Having removed the tape and cover you can now drill the holes to suit the screws you are using (I used M3 Screws). A point to note! I have found that you can standardise on two basic screw diameters for use around the Workshop, M3 and M6 and it is well worth investing in, or saving any you come across, an assortment of these screw sizes and the relevant Drills and Taps.
With the Cover now secured to the Slide all that is required is a coating of Paint and you have a protected smooth operating Cross Slide. This version has been in constant use for over 30 months and never once has it been necessary to clean the Slide out as previously required, every so often I spray PTFE Dry Lubricant into the open end of the Cover to give the Slide / Bolt some Lubrication but no other maintenance is required .
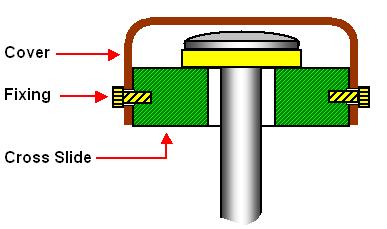
Picture showing Finished Item.
If the dimensions of the Slide on
your Lathe do not match the Rainwater Pipe I have used then you can use any
suitable alternative material, before I realised that I could use this Pipe I
had a Aluminum Cover made from 1.5mm thick material and bent to form the Channel
shape required.
| Tool Tidies |
Tool Tidies are the alternative to that old tin or jar that house all the small odds and ends of Tools that are used and that often get lost in the Shavings around the Lathe.
I simply cut sections of the same 65mm
square Drain Pipe, it does not have to be square, it could be round, to a suitable length (mine are 100mm
high) which are then glued, I found Hot Melt to be more than adequate, to a
baseboard, in my case a shelf and you have a home for all sorts of odds and ends
that make up every Woodturners arsenal.
|
|
Typical Contents of Tidies:-
|
I have 4 of these Tidies around the Workshop, two at the Lathe, one at the Drill Press and finally one by the Bandsaw that holds the Push Sticks used when Cutting and a Compass for marking out Round Blanks.
If you are making these items then keep the remainder of the Drain Pipe as it will be used in future Hints & Tips that will be coming soon, nothing will be wasted.
Update 2006
I now have a whole series of these
"Tidies" made from various lengths of Plastic Pipe to hold practically
any thing that you can think of.
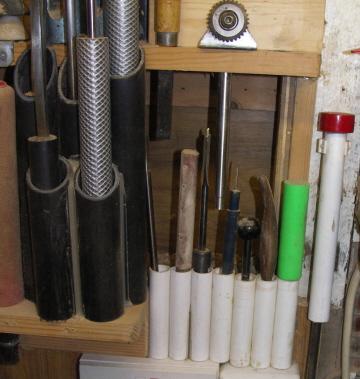
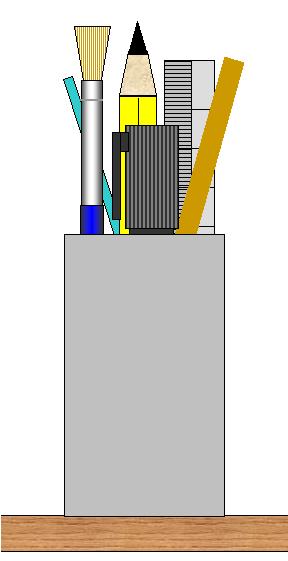
Here I have used Small Bore
Tubing [¾" / 1¾" Ø] for everything from Pencils to Tools
and any other Bits and Pieces. |
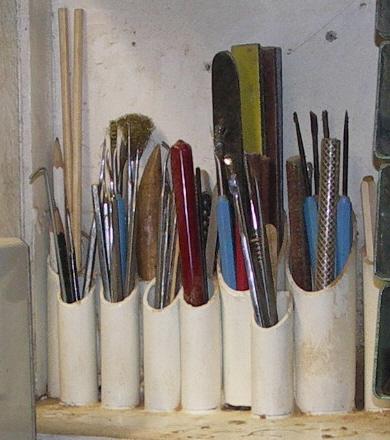
Again Small Bore Plastic Tube used to Store Dental Tools, Abrasives and Pencils Etc. |
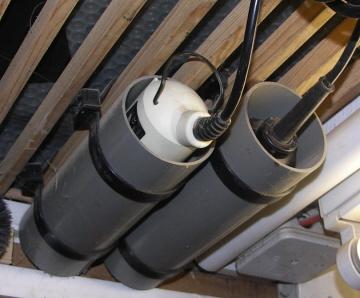
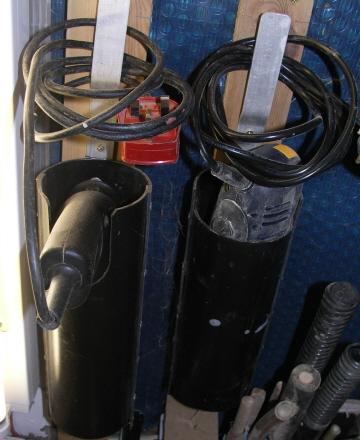
By using larger bore Pipe you can make useful holders for the Dremel and Axminster Multi Tool [above] the white tube to the right holds the Axminster Flexible Drive Shaft. Larger Tubing will hold a Power Drill and Rotary Tool and with the addition of a suitable Cable Clip these Tools are close to hand, out of the Shavings and ready for use. |
|
| Magnet C |
|
I use a Dovetail Baseplate with a number of Jaw Sets, and these are Screwed to the Wood Blank using 3 Self Tapping Screws which I find last much longer than Wood Screws being much stronger and less prone to shearing off when Screwing into really dense Hardwoods. Storing these when not in use has always been a problem yet the solution is so simple, a Magnet attached to a suitable surface and instant storage is available. |
|
I have in fact Glued this Magnet onto one of the Tidies described above as this is convenient to the Lathe, but prior to that I just attached the Magnet to the Headstock Cover, then when not required it was removed and stored away along with the Screws still attached.
| Holder for Laminated Information Sheets |
Throughout this series of Hints & Tips you will see references to Laminated Information Sheets as above, these are your quick reference to common Dimensions, Settings or Procedures associated with the common operations at the Lathe and other machines such as Drill Press, Grinder and Bandsaw, and therefore up to 4 of these Holders may be required.

I used the Spring Loaded Ring System from standard Ring Binders which can easily be removed from the Old Files by drilling out the Rivets holding them in place, they are then Screwed to a convenient Support Board ( i.e. the Wall) and the Laminated Sheet with two suitable Punched Holes (Europe A4) are inserted.
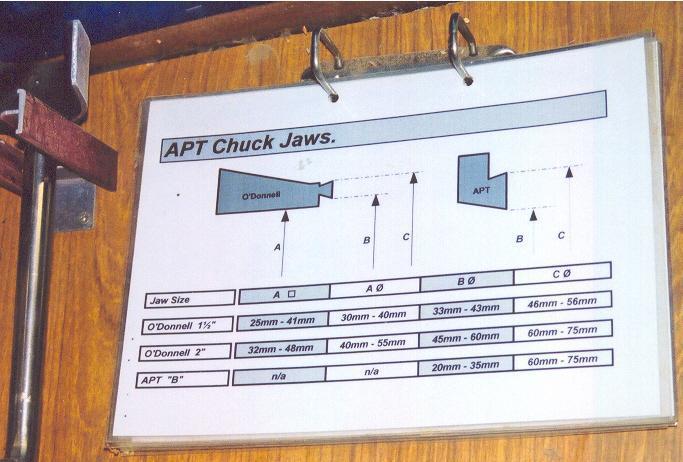
In my case the most common information sheet, Jaw Capacities, is on top and the rest placed in descending order of use behind, now any time I require that Dimension or require to know the Capacity of a certain Jaw, it is there to hand and always in the same place.
| Bandsaw Blade Storage |
In the Woodturning News Group recently there was a lot of responses to the request regarding the folding of Bandsaw Blades, which were answered in two basic ways, either directing readers to a certain Web Site where the relevant instructions could be viewed and then there were the experts who do it every day of the week attempting to describe the process in words, some I might add more successfully than others.
I have this wicked vision of Woodturners around the World closely entwined with there Bandsaw Blade, probably minus the odd finger.
My solution has always been that once un-folded always un-folded, and yes I am a carefully un-tape it and throw it on the Lawn and Duck type, after that if not in use they live cradled above my Head in the Workshop.
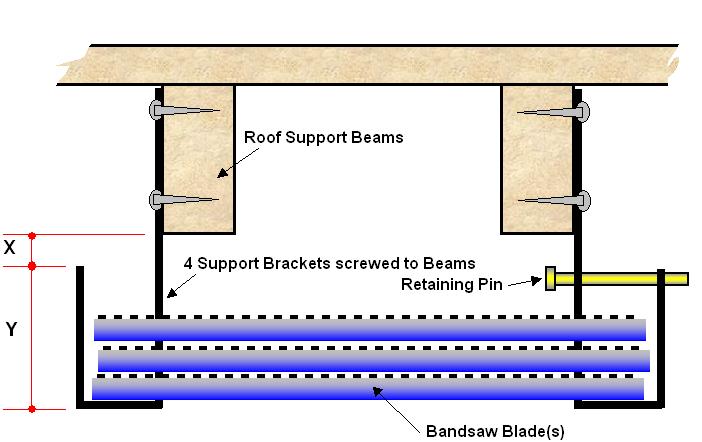
The principle is shown in the Sketches above and below, I store no more than 3 Blades at any one time and this number will determine the Dimension "Z" in the final Sketch, as the maximum width of Blade I use is ½" (12mm) then this needs to be no less than 1¾" (45mm) if you want to store more Blades then you have to increase this accordingly. But beware that it is not so low that each time you walk under it you give yourself a shave, it is far better to go Bald naturally.
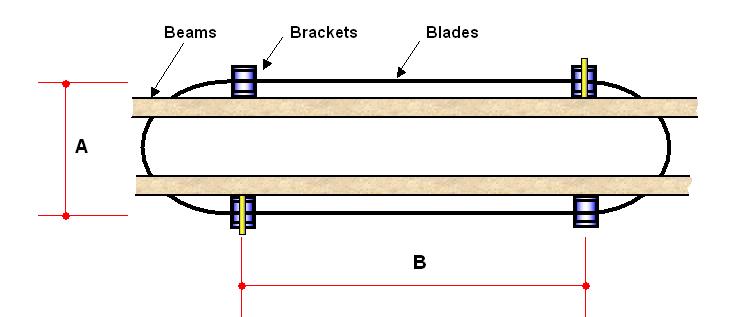
Dimension "X" is also important as this allows the Blade to be entered into the Supports, if the Maximum Blade width you use is ½" (12mm) then this should be at least ¾" (20mm). My Bandsaw uses 88½" Blades and the relevant Dimensions "A" @ 12" (300mm) and "B" @ 24" (600mm) are the least stressful sizes for storing the Blades if they are to keep a good shape and not "kink".
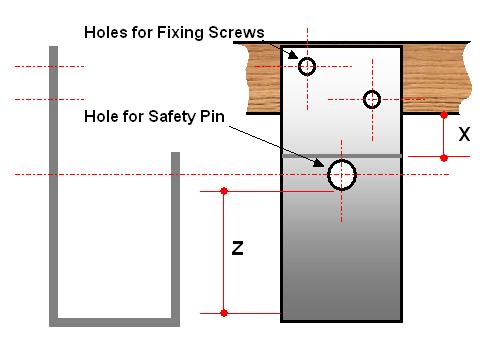
I first made 4 Brackets as shown above from some off cuts of 1.5mm Steel which I had and this happened to be 50mm wide and this has proved to be adequate, these dimensions are not so important, you only need to ensure dimensions "X" & "Z" are suitable for your requirements.
These Brackets were then Screwed to the Roof Beams of the Workshop in the positions indicated above to suit the 88½" Blade's that I use, you will need to establish the best dimensions for your size of Blade.
The Retaining Pin was an addition I made after a piece of Wood that flew of the Lathe dislodged the Blades and caused more mayhem than the Wood itself. These Pins happen to be made from a 6" Nail cut down to a suitable length to pass through the two holes in the Brackets, but any Bolt, Screw or Bar will do.
If you cannot fix this as suggested above, then the principle can be applied for storage in the vertical and I have tried the same arrangement but with the Brackets (modified with a right angle fixing flange) screwed to the inside of a Cupboard Door (an old Wardrobe I use to store my Hand Power Tools in) and this was just as successful.
Now when ever I buy a new Blade its onto the Lawn to initially un-fold it and then fit it into the Support Rack until it is needed.
If you still prefer to Fold & Store then the following site http://www.taunton.com should help, for other useful sites on Bandsaws then go to the Bandsaw link page of this Web Site.
|
|
|
LaymarCrafts Woodturning is the Web
Site of Richard & Sheila Stapley Last update 19 July 2007
|
|
Web Site Design & Construction by Richard Stapley. |