| LaymarCrafts Woodturning | Hints & Tips |
| Reverse Mounting for Hollow Forms |
Reverse Chucking of Bowls is now much simpler with the aid of Button Jaws and their variants, and even Natural Edge Bowls can now be reversed with the advent of the Vacuum Chuck but I found Hollow Forms, Vessels and Deep Pots were not so well catered for and as I was about to turn a lot of Hollow Forms and Vessels from a stack of Burr Horse Chestnut I set about making a Jig that could offer the equivalent to Reverse Chucking.
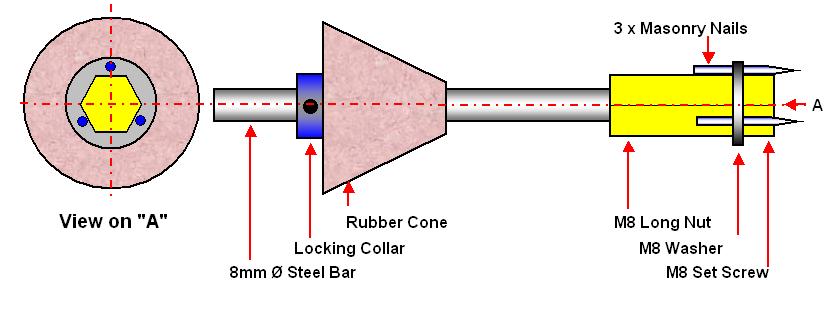
I had in mind a form of Drive that would locate on the Bottom of the Hollow Form based in principle on the Pronged Driver often used for Spindle Work, this would need to be at the end of a Shaft of sufficient length, to accommodate the depth of the largest/tallest Vessel I was likely to make, plus an amount for holding in the Chuck.
The opening in the Hollow Form/Vessel would be supported by a Cone held in place by a Locking Collar, the final support is via the Revolving Centre in the Tailstock, this can be clearly seen in the pictures below.
The Locking Collar is a 8mm Depth Stop for a Drill and is ideal, you could also make a Collar from a drilled out M8 Nut with a hole drilled and tapped through one of the flats to take a M6 Grub Screw.
|
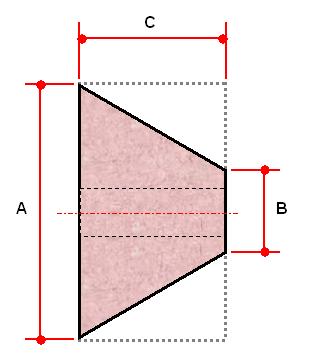
For the Cones I have used Rubber Door Stoppers these come in various sizes, and Colours, and can be shaped quite easily with Coarse Abrasive on the Lathe. Simply mount the Rubber Door Stopper onto a M8 Bolt and clamp it firmly with a Nut and Washer, hold the protruding threaded part of the Bolt in the Lathe Chuck and Sand to a Cone shape. I have 3 such Cones from different size Stoppers and these give me the following sizes:-
|
 |
|
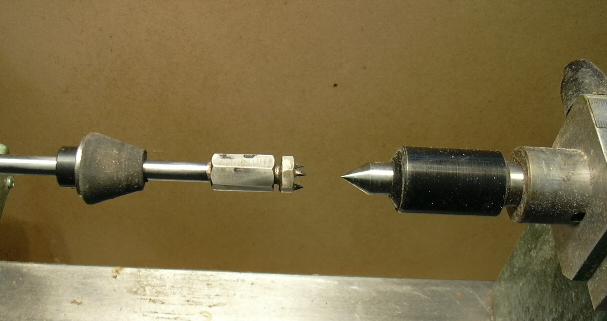
This
Photo shows the actual assembly for a Small 3 Prong Head. You place the
Hollow Form/Vessel over the Jig and locate the Revolving Centre in the
Centre of the Base, then locate the Cone into the Hole of the Piece and
hold it firmly in place, with the Left Hand, now you slowly advance the
Revolving Centre/Tailstock Barrel until the Pronged Drive engages
with the internal Base of the Piece, then with the Cone still held firmly
in place bring up the Locking Collar and Fix. |
|
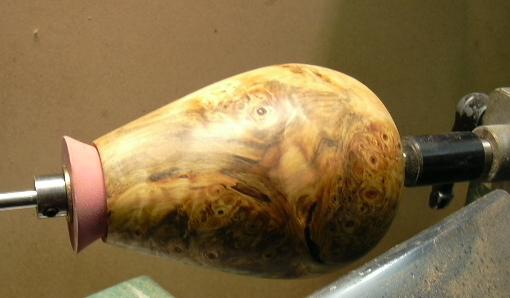
Vessel Mounted ready for cleaning up base using Larger Cone. |
The Drive Ends are formed from basically M8 Screws and Nuts including Long Nuts, and attached by Screwing into the M8 Long Nut which is either Silver Soldered or Screwed to one end of the 8mm Ø Main Bar, which in my case was from Silver Steel and 330mm [13"] long.
The Drive shown above is formed from a M8 Long Nut and a M8 Bolt [Threaded length = half the length of the Long Nut] and Washer, screw the Bolt into the Long Nut with the Washer trapped as shown, three equally spaced holes are now drilled through the Washer, these are of a diameter to suit the 3 Masonry Nails and positioned such that the Masonry Nails, with there heads ground off, lay along the body of the Long Nut.
With the Masonry Nails protruding about 4/5mm beyond the Head of the Bolt, you now fix them in place with some thin wire wrapped around the assembly, the Masonry Nails are now Silver Soldered in position. The Wire is now removed and the assembly is cleaned up.
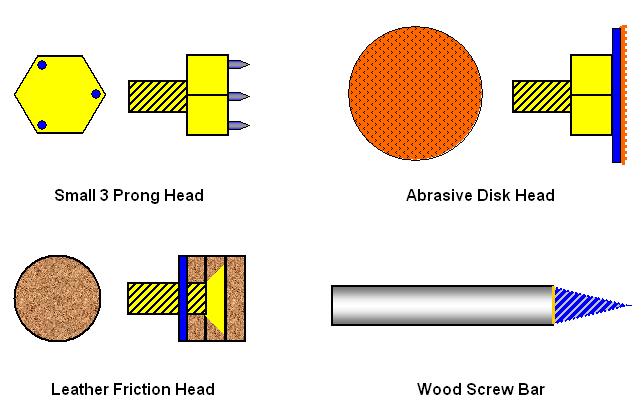
In the sketch above I show some of the other Drive Heads I have made for different types of Turnings, the Small 3 Prong Head is based on an M8 Bolt drilled with 3 equally spaced Holes, again to suit the cut off Masonry Nails, again these should protrude by no more than 4/5mm, which are Silver Soldered in place.
For Deep Pots where the Small Indents made by the Pronged Drive are undesirable I use a Friction Drive Assembly which has either an Abrasive or Leather Head, both of these are shown above.
The Abrasive version is from an M8 Bolt again with a Washer Silver Soldered to its Head onto which I stick, with Contact Adhesive, a Disc of 80 Grit Abrasive, by using different size Washers you can have various Drives to suit your needs.
As an alternative I have an Leather Drive which is made from 3 Discs of Shoe Leather, one with a 8mm Hole, the second has also a 8mm Hole which is recessed to take the M8 Countersunk Screw and finally a plain Disc. These are assembled as illustrated and Glued together with a Washer at the back to give support.
 |
The
final Drive is a Bar with a Screw at one end, I have various sizes of
these and use them for reversing such items as Knife Handles and Weed
Pots.
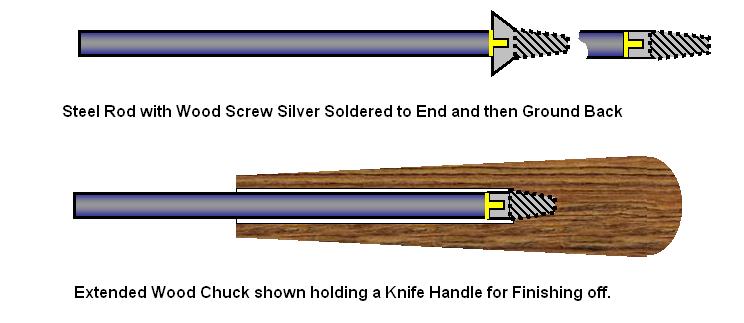
I make these using Self Tapping Screws with a Coarse Thread as they tend to be Harder than normal Woodscrews. By carefully positioning the Screw on the end of a suitable Metal Bar you can, with care, Silver Solder the two together, I find it is easier with the Screw Head still in place as this can be Ground back once the joint is made. This particular style of Drive Bar does not utilise the Cone and Locking Collar it relies on the Bar being the same diameter as the Hole in the Item. |
If the Bar is not equal in size to the Hole then you can simply simply increase the diameter of the Bar temporarily at the point it enters the Item by wrapping some Masking Tape or other suitable Tape around it.
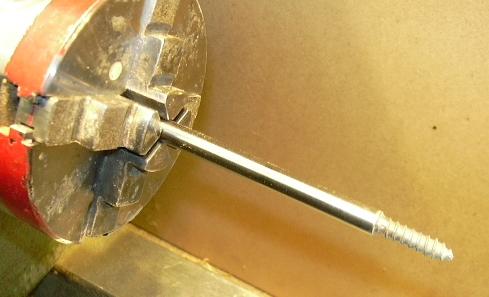
Both the Screw Drive Bars and the Hollow Form/Vessel Jig are held in my Axminster 4 Jaw Chuck with the Engineering Jaws fitted [see picture above] , these are a useful addition for the Chuck and can be recommended, alternatively you could use a Standard Drill Chuck mounted in the Headstock.
Parting Off Catcher
How many times have you spoilt a piece as you Part it Off and let it slip onto the floor or it clouts the Lathe Bed on its way down? like me probably more times than you would like to admit too.
My last loss of control actually broke the Vessel and, after a couple hours of work, all I had to show for it was some well polished Firewood.
Being right handed means I control the Parting Tool with my right hand and control the Item being Parted Off with my left hand i.e. my arms are effectively crossed!
This is not generally a problem but there are occasions where certain Shapes and Types of Turning are difficult to control with one Hand.
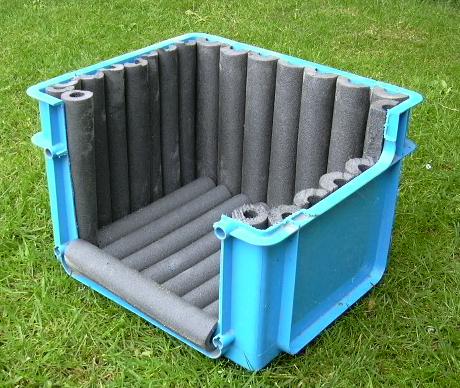 |
So
I made this simple "Catcher" from an old Plastic Storage Box
and lengths of Foam Insulation, as used for insulating Water Pipes.
The Plastic Storage Box is 350mm x 300mm x 230mm [14" x12" x 9"] and you need to cut out one of the long sides, I kept the corner and adjacent rib to maintain strength and stability. You will also need to cut away the end, as shown, to give access to the Parting Tool and Rest during use. The Foam Rubber is simply stuck to the Box using Carpet Tape. The "Catcher" sits beneath the Workpiece and catches any awkward shaped item rather than trying to catch it with your Hand. Since I have been using this I have noticed that any item will naturally fall away from the Parting Tool and will generally hit low down in the top right hand corner, as viewed in the photo above, with the Piece coming to rest along the bottom of the Box, again as viewed in the photo. |
This may well be an item that would be an aid to any Disabled Turners for all forms of Parting Off?
|
|
|
LaymarCrafts Woodturning is the Web
Site of Richard & Sheila Stapley Last update 06 May 2008
|
|
Web Site Design & Construction by Richard Stapley. |