| LaymarCrafts Woodturning | Hints & Tips |
| Workshop Rubbish |
Any session in the Workshop produces an endless amount of Rubbish, used Abrasives, Paper Towels, Steel Wool etc. etc. and with Space now very much at a premium the days of my old Dustbin [Trash Can] were coming to an end and I needed a solution that would save me space.
I had for some time used Rubble Bags, as opposed to the thinner and less durable Black Rubbish Bags, for the more Cumbersome Waste but not on a permanent basis.
So I decided to use this type of Bag supported in a frame in a convenient space to the Lathe so that I could as required "Toss" any Rubbish / Waste in without taking up too much space or cluttering up the Floor of the Workshop.
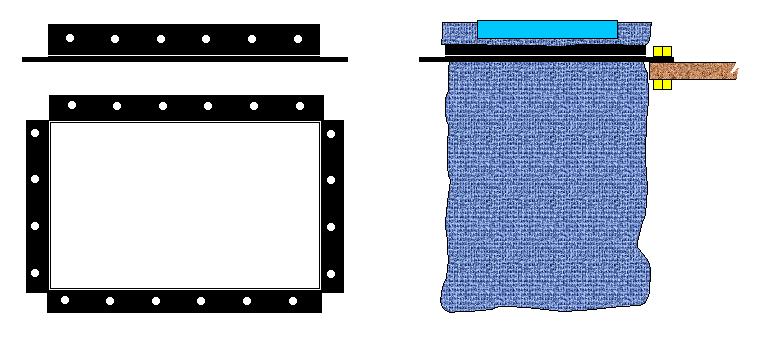
The Frame to support the Bag is made from a length of Perforated Angle [Dexion Type] although any lightweight angle will do, cut and fixed to make a rectangular frame generally as shown above.
First you will need to measure the width of the Rubble Bag, in my case this was 65cm [26"] and therefore I would require a length of Angle at least twice this length i.e. 130cm [52"] to make a rectangle of 40cm x 25cm [15" x 11"].
If you are using a single length you mark of from one end and draw a line at 40cm [15"] and cut through one of the Flanges only, then from this cut mark a line at 25cm [11"] and repeat the cut, continue with a cut at 40cm [15"] which should then leave you with a further 25cm [11"] to the end, you are now ready to bend the Frame to the required shape.
Once this is done you will need to either Weld or Bolt the Frame together at the open Corner and then if required give it a coating of paint.
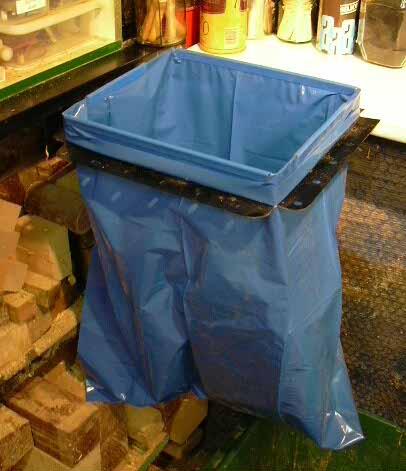 |
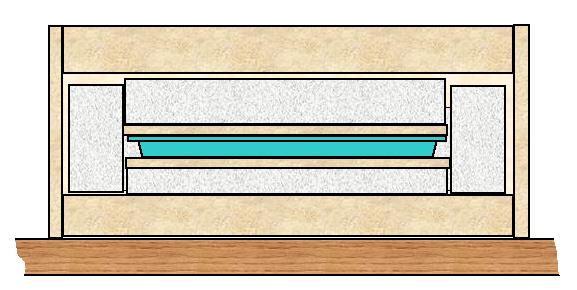
The
Frame is seen here bolted with 2 x M6 [¼"] Bolts to a Shelf which is
positioned to the left and behind where I stand when I am working at the
Lathe.
The "Hit" rate for Rubbish into the Bag from the Lathe is getting better all the time. The Bag is folded over the Angle Frame and held in place with 4 lengths of Plastic Paper Binder ,these are just visible in the Picture but unfortunately they are Blue and practically the same colour as the Bag. These are the type of Binder that you use to hold together sheets of paper and are basically a "U" section of plastic. You can use practically any thing, Bulldog Clips, an Old Belt, Giant Jubilee Clip, String, Wire or just wrap Tape around it. The exposed ends of the Angle, where the original cuts were made, are rounded of for safety. I used this type of Angle because I had some to hand, but the basics is to make a Rectangle that you can attach to a support and with a Flange onto which you can fit the Bag. |
Wax Sticks
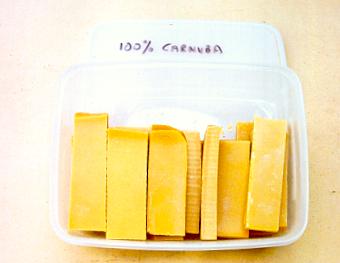
I have for some time been making my own Wax Polishing Sticks whether they are from Pure Beeswax, Carnauba or a Mix of both.
The raw material is much cheaper than the Branded Sticks and comes in many forms, Blocks, Flakes or Pellets and is available from either Specialist Woodfinish Suppliers or Beeswax from your local Bee Keeper at a fraction of the cost.
I prefer to use a Pure Carnauba Stick on the majority of my Work but I also occasionally use a Beeswax Stick or a 70% Carnauba to 30% Beeswax Stick although this mix may not be to your liking the beauty is that you can experiment without incurring to much cost.
Melting the Wax is fairly straight forward and I use an old Heavy Duty Aluminum Saucepan over a Low Heat from a Camping Gas Burner, as SIWMBO is not so keen on me using the Kitchen Stove.
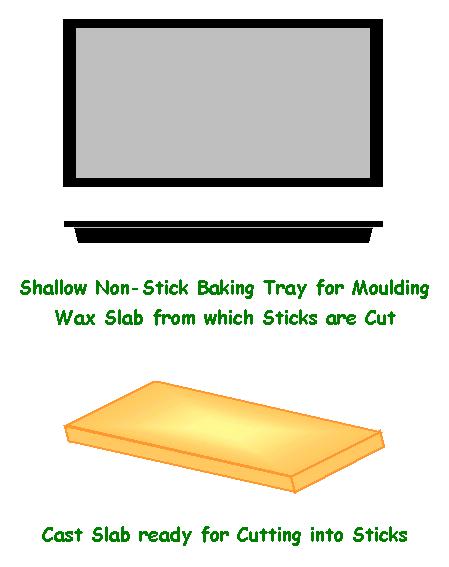
Once melted, and mixed when applicable, the Wax is poured into a shallow Non-Stick Baking Tin which in my case measures 27cm x 17.5cm x 3cm [10" x 7" x 1¼"], it is preferable to have a Tray with a slight slope / taper to the sides as this makes it easier to remove the Wax slab when the time comes.
The Tray sits on a piece of Hardboard or Ply with a piece also on top of the Tray as shown.
Left like this, overnight, you will achieve a slow controlled set of the Wax slab that will produce a constant density and even texture, this produces a quality Wax Stick at a tenth of the Cost of the Branded Type.
Any broken Sticks or leftovers can be put to one side and melted down with the next batch although that may be some time away as my batch of 18 lasts me about 3 years.
The Tray I have
used requires about 500g [1.1lb] of Wax to make the 18 Sticks
described above.
 |
When the Wax is set the slab is removed and Cut, I use the Bandsaw, into 18 Sticks each Stick measuring approximately 8.5cm x 3cm x 1.5cm [3½" x 1¼" x½"]. These I store in a Plastic Food Container marked with the Type of Wax and Mix. |
Abrasive Wax Polishing Sticks
In the article above I described how I made my own Wax Polishing Sticks, since I wrote that article I have been carrying out some experiments with Abrasives added to the basic formula of Carnauba and Beeswax.
This Article describes the new Mould and Hardening Box I made and the mix for these new Sticks.
Although you could use the original concept to cast these Sticks I decided on making a Single Stick Mould which could be housed in a small Insulated Box for Setting.
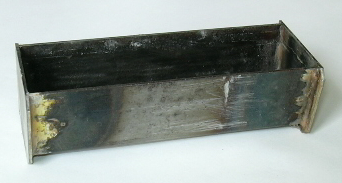
For the Mould I used a length of Lightweight Mild Steel Channel with the ends sealed by Silver Soldering on a MS Plate at each end, this Channel is slightly "Splayed" out so that the Wax Stick can be removed from the Mould without any trouble.

Imperial Sizes = 4" x 11/8"
x 1". Thickness of the MS Channel and End Plates is approximately 1mm
[1/16"].
Make the End Plates slightly larger than the end of the Channel and this
will ensure an Air Gap around the Mould when in the Insulated Box, this
will make sure the Mould is not in direct contact with the Insulation
which can melt at or near the temperature of the Mould.
|
The dimensions given for the Mould are not critical but the size of the Wax Stick has to be a practical size.
The Abrasive Wax Stick from the Mould has a Grayish Colour with a slightly Coarse Texture. |
When pouring the Wax it is not necessary to fill the Mould I in fact generally only fill to approximately half way. The Mould sits in the Insulated Box, described below, and the Wax/Abrasive Mix is Poured before closing the lid and allowed to slowly Set. |
As with the Plain Wax Sticks it is important to allow the Stick to Cool and Set Slowly and for this I made a simple Box from a High Density Insulation [Typically Styrofoam] but any Rigid Insulation will do, such as Polystyrene or Rockwall.
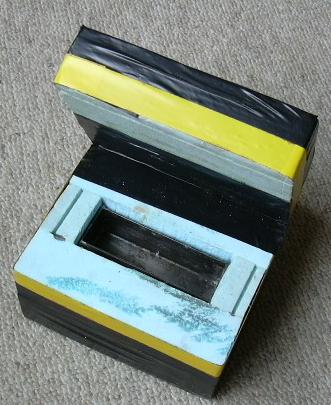
Insulated Box with Mould inserted in recess. |
The
Insulation needs to be about 35/50mm thick [13/8"
to 2"] and cut and stuck together to form a Lidded Box into which
the Mould can fit.
The bottom of the Recess for the Mould should be protected as there is a danger of melting the Insulation, I used a piece of 6mm [¼"] MDF plus the end plates on the Mould make for a small Air Gap under the Mould. The Insulation needs to be protected on the outside as it will easily get damaged for this I used Electrical Insulating Tape and used the same material to form a Hinge for the Lid. In use the Lid is held closed by a Weight placed on it and this acts as a reminder that the Box is in use. You should allow at least 3 to 4 hours before attempting to remove the Mould and even after this time, depending on how good the Insulation is, the Mould can still be quite Warm. The Sticks are made using either a Carnauba + Beeswax Mix or just Carnauba Wax and Pumice Powder melted together in a suitable Pot. My experiments have given me two types of Stick that adapt well to use on either Softer Woods [Chestnut, Beech, Elm Etc.] and the Harder Woods [Yew, Bubinga, Laburnum Etc.] that I tend to use. |
For the Softer Woods I produce a Stick made from 70% Carnauba and 30% Beeswax melted together and then add sufficient Pumice Powder to form a Mix that will just about Pour, I use a Spoon to ladle in the Pumice and Stir the Mix over a low heat until the contents of a Spoonful will just fall of the Spoon.
This is then Spooned/Poured into the Mould.
For the Harder Woods I have found a 100% Carnauba Base is preferable, following the same procedure as above.
You will soon know if the Mix is not correct as the Stick will clearly show a distinct layering of the Pumice [Bottom] and the Wax [Top], if this is the case simply re-melt and add more Pumice and then re-cast the Stick.
Results from both Formulae of Stick are as good as the Shop bought item at a fraction of the cost and for that reason I tend to use them more than I would have in the past.
As I have said I have come to these ratios by experimentation and as the base materials are relatively cheap, 500g of Pumice cost about £2 [$3] and 500g of Carnauba is about £7 [$11] and 500g of Beeswax can be as little as £4 [$6]. [500g = 1.1 lb] and will make about 6 to 8 Sticks.
So do carry out your own experiments to find the mix that suits your needs the best, as for me I intend to do the same but with Rottenstone, which is a Finer Abrasive, in place of the Pumice next.
|
|
|
LaymarCrafts Woodturning is the Web
Site of Richard & Sheila Stapley Last update 06 May 2008
|
|
Web Site Design & Construction by Richard Stapley. |