| LaymarCrafts Woodturning | Hints & Tips |
| Hollow Steel Tool Handle |
I am rapidly running out of space in my Workshop and one area that I have a major problem with is the necessary but cumbersome array of Turning Tools that I have acquired.
I decided that I would do a survey of each and every Tool and assess the usage of each and everyone over a 3 Month Period of Turning.
I soon realised that many Tools were used very infrequently, not least some of the Smaller Detailing Tools I have for those once in a while Turning requirements, I also had a range of Small Gouges all of which took up valuable space.
All of these Tools had one thing in common they were made from 8mm Ø Steel [ 5/16"] and therefore could be fitted into a common Handle and therefore reducing the Storage Space I would require for this group of Tools.
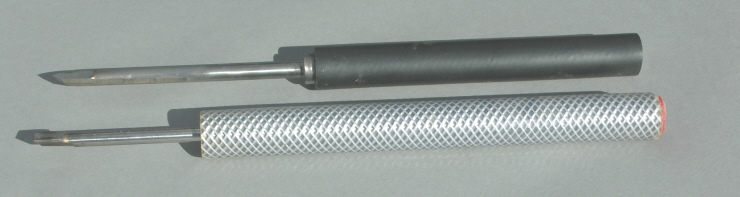
The Picture below shows the finished Tools, I couldn't resist making a second after the success of the first which only had one short coming, it was not long enough to give the degree of control needed when performing more aggressive cuts.
Added to this you will require an M6 Grub Screw [¼" equivalent], a means of Welding or Silver Soldering and an End Cap for the non business end of the Handle.
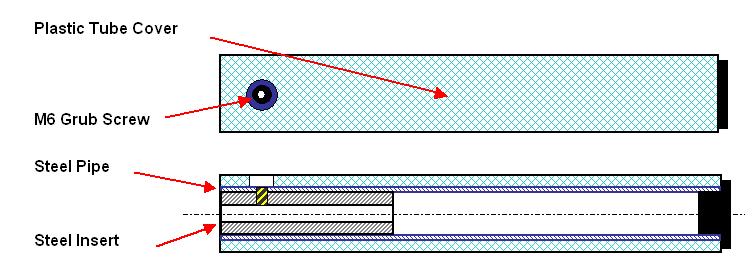
The Steel Pipe required will be approximately 18 to 20 mm Ø, and 250 to 400mm long [ ¾" Ø x 10" to 16" long ] and you will require a shorter length [ at least 75mm 3" ] of Steel or, as in my case I found a length of Steel Gas Pipe that was a "Firm" fit in the Handle Pipe and as an added bonus had a 5/16" Ø bore.
The insert is prepared and inserted into the Pipe for the Handle and either Silver Soldered or Welded in position, I prefer the Silver Soldered method as you will get, if Brazed correctly, good penetration along the length of the Insert.
Once the Handle is cooled down and cleaned up, you can mark and drill the Hole to suit the Grub Screw which locks the Cutting Tool in place, this should be in the order of 25mm [ 1" ] from the end of the Handle and as this is anticipated for only light usage one such Screw is more than adequate.
For the Handle Covering I used the Clear Thread Re-Enforced Hose which is obtainable from any Hardware Store, providing the Handle Pipe and the Hose are the same size you should have no problems sliding the Hose onto the Pipe, however I found the fit onto the longer Handle I made was a little tight and it was necessary to heat the Hose, with a Hot Air Gun, and add a bit of Lubricant to get the Hose to slide on.
Finally you will need to cut a hole in the Hose, where the Grub Screw is positioned, to gain access, either by carefully cutting with a sharp knife or use, as I did, a Wad Punch of a suitable size. As I happened to have an old Plastic Pipe Cap that fitted into the end of the main Pipe I added this to finish off the non business end of the Handle.
 |
Although in this form the
Plastic Pipe Handle is fine I did for the longer Handles add a covering of
Electrical Heat Shrink Tube which when Heated, with a Hot Air Gun, will shrink
to fit the Tube and any contours, by this I mean anything placed on the Tube
such as an "O" Ring to form a Thumb Register at the Tool End and with
one at the Rear End for reference.
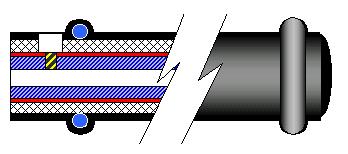
The picture left illustrates how an "O" Ring placed over the Plastic Tube of the Handle will form a Ridge when covered with Heat Shrink Tubing. |
Simple Tools for use with the Tool Handle above.
As explained above many of the Tools that were to be used in the Handles I have made were only used on an irregular basis this was because they comprised of mainly small Detail Scrapers for Grooving, Beading or Undercutting that were made from 5/16" Ø Silver Steel, these were on average 150mm to 200mm long [ 6" to 8" ].

The picture above shows some of these Tools, because they are relatively easy to make and at a realistic cost I tend to have many shapes and various sizes so that I can be exact in what I achieve with my Turning, if I do not have what is required I can either re-shape an existing Tool or quickly make the right shape required for the particular task.
I have Tools with Bent or Hooked ends for working inside small Hollow Forms, very thin Tools shaped as for a Parting Tool but very thin for cutting fine grooves, these are made from old HSS Hacksaw Blades, a Multi-Groover from an old HSS Thread Chaser, and another uses the Sorby Texturing Principle but with a very small Toothed Gear Wheel, the combinations and designs you can make are endless.
Previous Tips have covered the making of similar Tools.
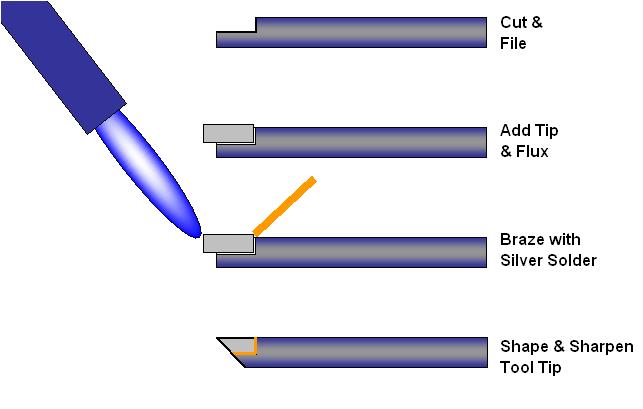
In the picture above I show a quick guide to the stages involved in making Tools with HSS Inserts.
Requirements are:-
A length of Silver Steel of suitable diameter.
HSS Tool Steel Blanks approx. 20mm x 10mm x 3mm thk. [ 3/4" x 3/8" x 1/8" ].
Silver Solder & Flux.
MAP Gas Torch.
Associated Site Pages that will be of assistance:-
![]() Making Tools
Making Tools
![]() Silver Soldering
Silver Soldering
Wire Burner
I am not big fan of Burnt Grooves on Woodturning but I was recently asked to perform the task on a Commission Piece and therefore had to devise a way to achieve the desired affect.
I have seen many alternatives, but nearly all were based around a length of Wire semi-wrapped and forced into the Groove where the Burning is required, and not wishing to re-invent the Wheel I proceeded along those lines.
For the Wire I used a length of Stranded Wire from an old Bicycle Brake Cable that was in the "Junk Box" and for the Handles two short lengths of Round Steel.
 |
The
the Handles were made from 12mm Ø [½"] MS Bar 115mm long
[4½"] and had a 1.5mm hole drilled through the Bar in the middle
of it's length.
I cut a 460mm [18"] length of the Cable Wire using Sharp Side Cutters to ensure a clean cut. The 1mm Ø Wire was then passed through the hole in each of the Handles and carefully Soft Soldered in place. For comfort and a better grip I then slipped lengths of ½" Plastic Hose over each end of the Handles. |
It probably took me no more than 20 minutes to make and I have used it just once, it worked satisfactorily and it will, I'm sure, get used again one day, but in the end I was pleased that I had made the right Tool for the task and not tried to cut corners.
|
|
|
LaymarCrafts Woodturning is the Web
Site of Richard & Sheila Stapley Last update 06 May 2008
|
|
Web Site Design & Construction by Richard Stapley. |