| LaymarCrafts Woodturning | Hints & Tips |
| Morse Taper Ejector for the Tailstock |
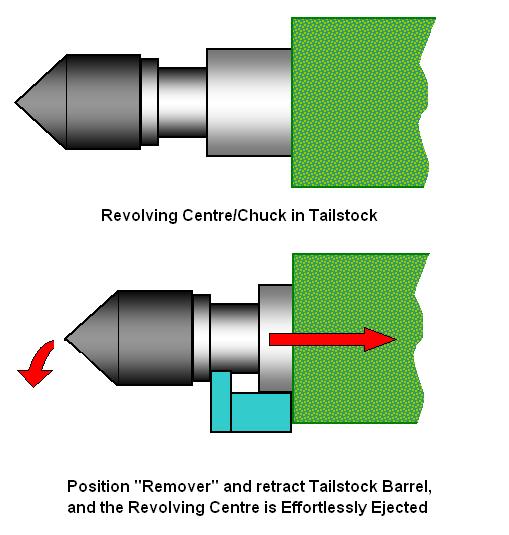
I have never been happy using the Ram Bar approach for removing any item with a Morse Taper from the Tailstock Barrel as I felt their were too many opportunities for damage, particularly when the Morse is a little tighter than normal in the Barrel.
My solution was to use the Barrel Retraction of Tailstock to insert a force on what ever was fitted into the Tailstock of the Lathe whether it be a Jacobs type Chuck or a Revolving Center.
The collection of fittings with a Morse Taper that I was likely to use in my Tailstock all had, bar one, a Collar or Raised Point ahead of the Taper against which my "Widget" could register whilst the Tailstock Body itself has a nice solid edge onto which the Widget would sit.
As for the one Center I had that did not have such a collar I simply do not use it and now when I ever purchase a Morse Taper Item I always ensure it has a suitable register for my extractor.
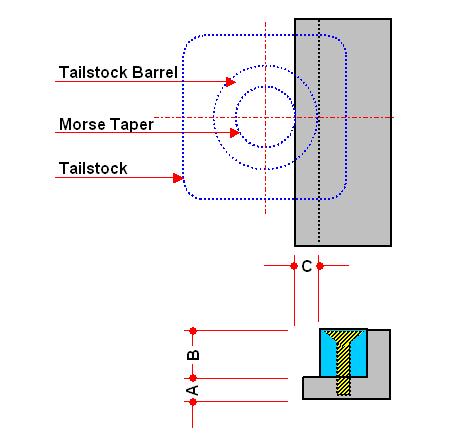
The construction is fairly straight forward once you have determined the critical dimensions, as indicated above, I used off cuts of Aluminum [the Angle piece was in fact an old Door Pull].
A+B should be equal to the distance from the rear of the Collar of the Morse Taper to the point of register on the Tailstock against which the Widget will rest PLUS at least 5mm [1/4"], but make sure "A" will fit between the Collar and the end of the Barrel.
C is effectively the thickness of the Barrel wall, although I found by making this slightly larger and profiling the flange at the point of contact with the Morse Taper I achieved a better location.
|
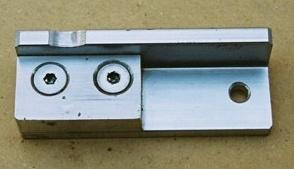
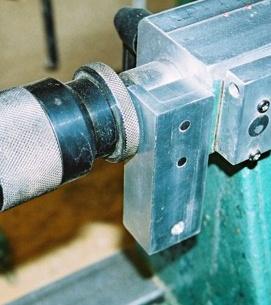
The actual "Widget" is shown above and right in use, the slight cut out was a modification to give more register for easier use and the hole is simply for hanging it up by. In use the system has been very successful and has always easily removed the Morse Taper from the Barrel in a controlled and less damaging way. |
|
Shop Made Rasps
During some of my experimental Turning I have often found the need for a method of removing material by other means than Turning, a Rasp would have been the answer but as these cost money and there use would have been only occasional I decided to make some of my own.
I had for some unknown reason saved a load of old Bandsaw Blades which were too blunt for sawing with, I think my intention was to re-sharpen them but never quite got round to it, so I decided to turn them into a series of Rasps.
I first cut each Blade into a number of equal lengths to suit various sizes of Rasp, but generally 200mm to 300mm long [8" to 12"] and then by bundling these together I could make Rasps of different lengths and widths.
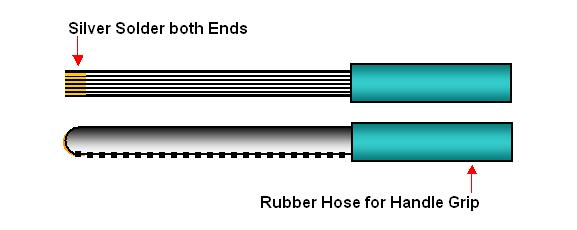
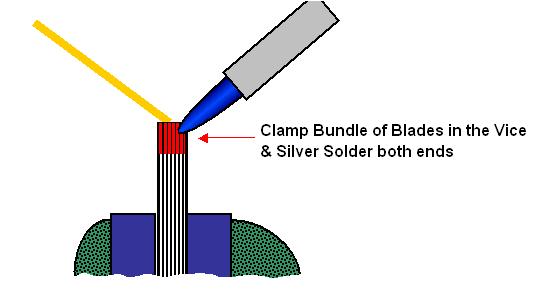
I take 4 lengths, or 6 or 8 depending how wide you want the Rasp to be, of cut Bandsaw Blade and clamp them in a Vice and simply Silver Solder each end.
Once the Rasp has cooled down you can trim the ends by rounding off using a Grinder and for a Grip I used a short length of Water Hose, the type used for connecting the Washing Machine to the Water Supply is ideal.
I now have a half dozen Rasps of various Sizes and Coarseness, by using either ¼" or ½" Blades with 4tpi or 6tpi, I even have one that cuts on the Pull Stroke for a particular Perforated Vessel I was making.
Hip Operated Lever Safety Switch Adaptor
In a previous Tip I explained how I made a Safety Switch that could be used at various locations around the Lathe and the possibilities of using various, foot, elbow etc. to operate it.
Like most things Woodturning you think you have solved all the eventualities when another requirement presents itself, such was the case with the Safety Switch, I had a requirement where I was in close at the Lathe with a Parting Tool in one hand and the left hand supporting the item that was being Parted Off with a requirement to stop the Lathe just at the point of Parting the Turned Master Piece from the Holding Spigot.
For this I determined my Hip was the best part of the Body to operate the Switch but found with the Switch Box mounted on the Headstock I did not have the degree of control I was looking for.
My solution was to attach a Lever to actuate the Switch, using the Hip when standing in the most comfortable position for the operation I was doing.
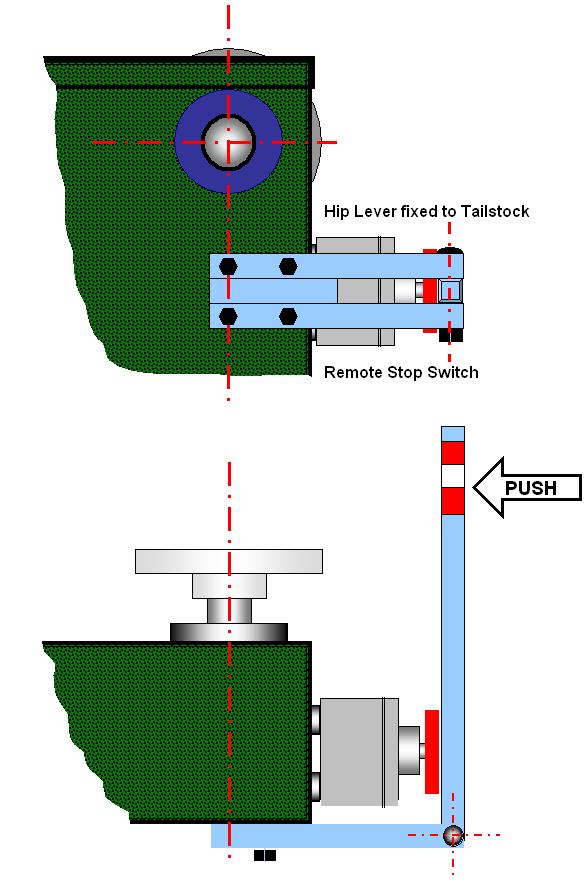
The Sketch above shows the Lever which is made using 1" square Aluminum Tube, or any other suitable sized material, the support /pivot uses 3 pieces of tube of a suitable length, to suit your Lathe & Switch, the middle tube being 2 x the tube size shorter than the outer tubes [i.e. 2" in my case].
These three pieces are bolted together [I used M6 Bolts] as shown with the edition of a Shim between the top tube and the middle tube, [I used a piece of stiff paper] so that when the Lever is fitted it moves freely.
This support/pivot bracket is then attached to the Lathe, again in my case I used two M6 Setscrews into two drilled and tapped holes in the Headstock.
The Lever can now be cut to the ideal length to suit, or if required you can have Levers of different lengths for different projects, and fitted as shown with the pivot bolt only lightly tightened to ensure the Lever movement is Free & Easy.
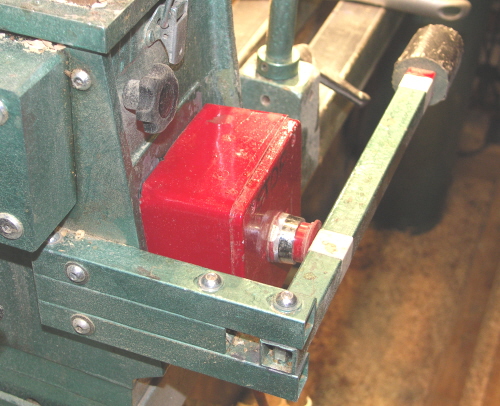
When not in use the Lever is Swung round and Parked towards the rear of the Headstock, this is made possible only if the middle tube of the support is not too long.
Economical Paper Towel for the Workshop
 |
This
is not so much a Tip but a Cost Saving Idea for those of you that use
Paper Towels in the Workshop.
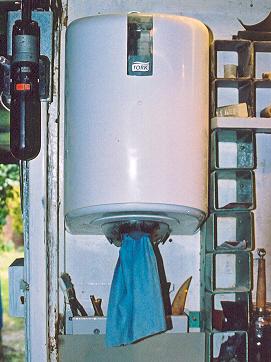
For many years I used Rolls of Kitchen Towel to Wipe of excess Oil, Sealers and Polish plus mopping up and general cleaning, I often found these to be either too absorbent or very weak. I also seemed to get through a Roll very quickly and often ran out at that crucial moment, add to this the cost of each Roll and I set about finding a better option. At the local Cash & Carry I came across the solution shown in the Picture, the Paper Dispenser is the same as you find in most Catering Establishments and uses a Double Ply, High Strength and Absorbent Roll of Paper with nearly 500 sheets of Paper Towel compared to the 70/90 on a standard roll of Kitchen Towel. Dispenser and 2 Rolls of Paper cost lest than £10 [$7] and the cost for a refill roll is something like a quarter of the cost for an equivalent amount of the lower quality Kitchen Towel. The Dispenser is fixed to the Wall of my Workshop in easy reach when I am working at the Lathe, the Paper Towel is protected from dirt and dust and you can tear off as much or as little as you require. |
I found the Paper to be much stronger than the Kitchen Towels I was using previously and although it is absorbent it does not fall apart if it gets too wet, as was the case before, and as an added bonus I find it works well as a Polish Cloth if required.
|
|
|
LaymarCrafts Woodturning is the Web
Site of Richard & Sheila Stapley Last update 19 July 2007
|
|
Web Site Design & Construction by Richard Stapley. |