| LaymarCrafts
Woodturning |
Hints
& Tips |
| Waxing the Cut Ends of Timber
Blanks |
I both Air Dry and Kiln Dry my
own Wood in all forms, Bowl Blanks, Logs or Squares and therefore need to seal
the Cut Ends to equalise and slow the Drying process down, for this I have
always used Paraffin Wax which I purchase in Granular form from Candle Makers
Suppliers.
At first I balanced an old
Baking Tin on a Primus and this was very effective until one day I accidentally
kicked it over and spent what felt like weeks scraping Wax of the Floor, my
Clothes and out of the Tool Box.
 |
This made me determined to find
a more practical and safer solution and fortunately this coincided with the
demise of our Deep Fat Chip Fryer (we were going to give up Chips anyway) which
suffered from a broken Lid Catch.
This immediately was seen as a
potential Heating Pot for Wax, it held a Volume that I thought would be ideal (2
Liters up to the "Max" mark), it had an "On/Off" Switch and
a Thermostatic Temperature Control and finally with the addition of a new Shop
made Lid to ensure a protected store for the Wax at all times.
The picture left is
typical of the type of Fryer we had, but they come in all shapes and
sizes, and if the Catch had not been at fault I would probably have kept
with the original lid and its open and close mechanism.
|
The Lid that I needed however was made
from two circular pieces of MDF the top piece was equal in diameter to the outer
diameter of the Aluminum container part of the Old Fryer, this was fixed to the
bottom piece of MDF which was sized to slip inside the pot and therefore form a
Spigot. To this I fixed a simple Handle for lifting the Lid.
I soon found this
was a very convenient method of Waxing Cut Wood and that it was always to hand
and could be switched on and ready for use in a very short time, consequently it
was never a problem to Wax small or large amounts of Wood, and Temperature
regulation prevented the Wax from overheating.
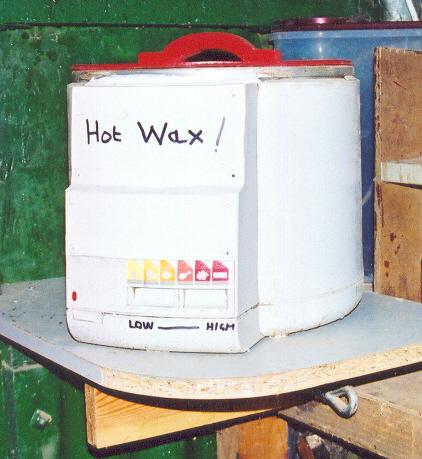
The picture above
shows the Waxer as it is today, the front is covered with an Aluminum Plate to
cover over the numerous openings that existed after removing the original Lid
Lifting facility, these openings allowed Wax, that was dripping from the Wood,
as I removed it from the Waxer, to get inside the outer casing and this
eventually damaged the On/Off Switch and Slide Adjuster.
Although I was
able to salvage the Heat Control Slider the On/Off Switch was beyond repair and
I now connect and switch the unit via a dedicated wall mounted Switched Socket.
I set the Slide
Control to "High" for melting the Wax and then slide it fully across
to "Low" when ready for use. In use I found that Logs and Billets were
easy to handle but Large Blanks were, I felt, liable to slip from my Grip and I
was wary of perhaps dropping a Blank into the Wax and the consequences of the
"Volcanic" type eruption that would ensue.
To overcome this I
use a Wire Mesh platform sited just below the top of the Wax that the Blank
could be rested on as it is turned to cover all of the perimeter edges. Fixed
with 3 drop rods that Hook over the Rim of the Pot it can easily be removed when
not required, but in practice I tend to leave it in place at all times.
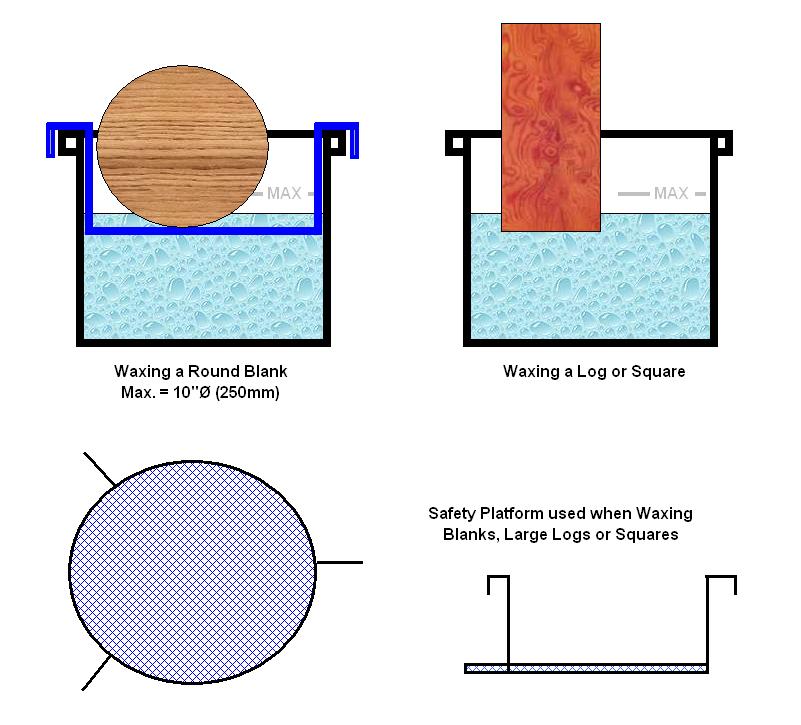
The maximum diameter that I can accommodate with the Model I
inherited is 10" (250mm) although there are models I have seen that will
take a Bowl Blank of 14" (360mm). This is not generally a problem for me
and if the need arises that I have a Blank of a larger size then I will either
revert back to the Baking Tin / Primus Heater method or simply Brush on some of
the molten Wax with a Paint Brush.
As previously mentioned I use
Paraffin Wax Granules, but I also put in any old Candles that come my way,
regardless of Size or Colour, you can either break them up to remove the Wick or
go fishing once they have melted.
The Granules are purchased in a
5kg Bag and these need to be stored until required, I found that spillage from
the Bag could be a problem and I solved this by purchasing one of the Plastic
Washing Powder Containers readily available from any Hardware Store.
These hold approximately
4kg of the Granules and have a snap on lid with a hinged cover over the Pouring
Hole and when more Granules are required in the Waxer you can easily pour them
in in a controlled manor with no spillage. Again such
containers make storage easy and take up far less space than the original bag
that the Granules come in.
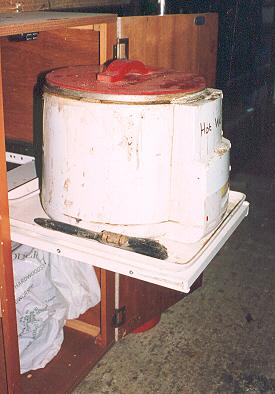
| Since
taking the Photo above of the Waxer, I have now placed it in a Cupboard
below a Work surface used to support the Belt Sander and Disc Sander. The
Waxer sits on a Shelf in the Cupboard, the Shelf is mounted on Drawer
Runners so that the Waxer can be pulled out of the Cupboard for use.
The Power supply Cable is
threaded through the rear of the Cupboard and Plugged into an adjacent
Switched Socket and as a reminder on the Door to the Cupboard I have a
Warning Sign "IS THE WAXER SWITCHED OFF" just to make sure we do
not turn the Cupboard into an Oven.
The lower half of the
Cupboard is used to store the Wax Granule Container and spare Paper Wipe
Cloths and Polishing Rags etc.
|
|
Turning Tool Storage
The collection of
Turning Tools we have is often well in excess of our needs and Stored in an area
where space is at a premium, this can make the storage of the various Gouges,
Scrapers, and Skews a problem that is often difficult to solve.
Many ideas have
been published and I have tried many, some with more success than others, and
you will recall I showed my solution for the Small Tools in an earlier Hints n
Tips and this remains my best solution, in my opinion, for that size of Tool.
The Normal and
Larger Tools are, through their very size, more difficult to accommodate
particularly if you have limited space, coupled with the fact that some Tool
Systems offer other challenges, the Stewart Arm Brace system for example.
Then we have Tools
with the Traditional Wooden Handle either Shop Bought or Home Made, or the
Modern Contoured Aluminum Handle full of Buck Shot, the Steel Pipe wrapped in
Comfy Plastic or Sponge type and even Cork.
The situations I
have found that made me look for an alternative to the more traditional tool
caddy arrangement of racks and shelves were:
-
Not Flexible
enough to cater for changing Tool Types and Shapes.
-
Collect too
many Shavings and therefore require clearing on a regular basis.
-
Occupy a lot
of space.
-
Rack system
needs to be at a low level.
-
Tool retention
often unstable if seating angles are too steep.
-
Tools can be
positioned with the Business End (i.e. Sharp) pointing up.
-
Difficult to
expand system for that new must have Tool.
-
Often Tools
Stored in an Un-Safe way i.e. Insufficient Support, Business [Sharp] End
pointing up.
So having bought
the latest addition to my Tool Collection with no space available to accommodate
it, on my Shavings Trap of a Tool Rack, I set about un-screwing it from the
Workshop Wall, and regretted that I had added some Glue to the fixing point, and
tossed it into the Trash Bin and decided to use a new solution I had seen in use
at various Woodturners Dens.
This idea is not
all my own work and as I have said I had seen the solution on a number of
occasions in use by others and the idea has also been mentioned numerous times
in a number of the Magazines.
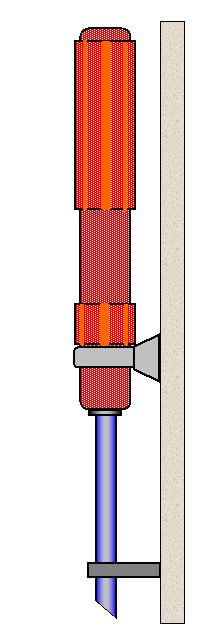
The
vast majority of my Tools are with Wooden Handles some of which are of my
own design others being the original that came with the Tool, the principle is simple
you provide a means of hanging the Tool by it's Handle with the Business End
pointing down.Two methods can be used,
either you can simply drill a hole through the handle or secondly you can
fix an Screw Eye into the end of the handle, both methods rely on a
Rail of suitable Spigots onto which the Tool can be Hooked for support.
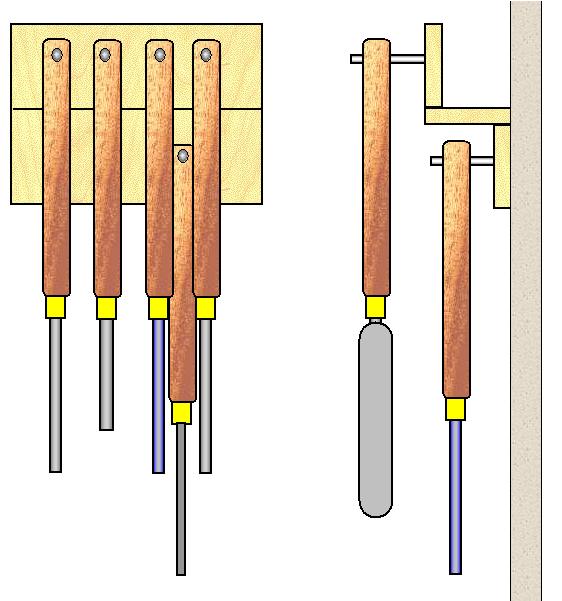
I prefer the Hole method
(it's cheaper) and I have two Wooden Battens screwed to the Wall of the
Workshop, just behind the Lathe at a high level, into these I have Knocked
a series of 2" & 3" Nails equally spaced to best suit the Handle
Diameters, I then cut the Nail Heads of using a Hacksaw and removed
any burrs and as added protection used some Electrical Heat Shrink Tubing
to encapsulate the Nail.
A Hole is drilled through
each Handle these are 3/8"Ø so that I do not have to fiddle around looking
for the Hole when Hanging the Tool up.
If you prefer to use the Screw
Eye's instead of drilling a hole then the principle of support is
exactly the same, except now you screw the Eye into the end of the Handle
and use this to hang it on the Nails as described above.
|
The advantages for either
system are:
- Easy to Store.
- No Traps for Shavings.
- Fully Flexible for
accommodating future Tools.
- Easy and Cheap to
construct.
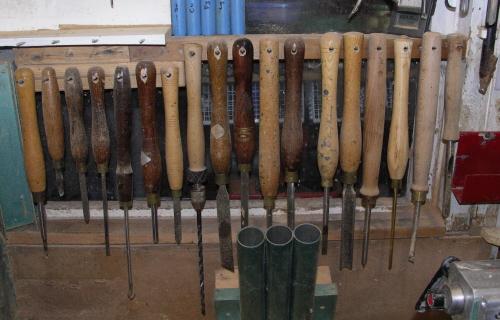
In
all I have over 40+ Woodturning Tools of various Shapes and Sizes each and
everyone is Stored by one or other of these methods, I have arranged the Tools such that they
are double layered as shown here.
Below this double row of
Tools, which are at a relative high level in the Workshop I have a row of
Shorter length Chisels.
In all the area occupied
is no more than 50cm x 130cm and being behind the Lathe towards the
Tailstock end means each and every one of these Tools are conveniently to
hand.
|
 |
The Tools are always
replaced on to there peg when not in use and therefore are less likely get
damaged or misplaced.
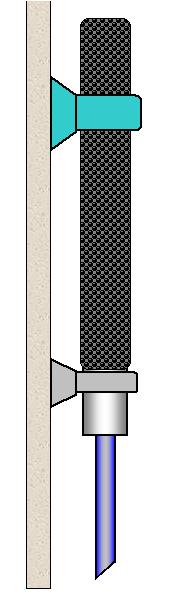
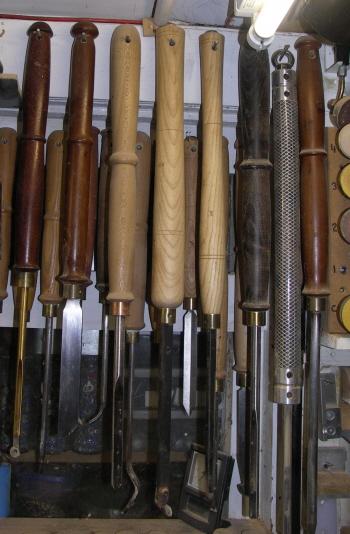
| As
part of my collection of Tools I have some of the modern Metal Handled
type, typically the Hamlet, Glaser, Oneway and Exocet Tool Systems
These present a slightly
different problem particularly if like me you are reluctant to drill
through the Handle.
Here I use an assortment
of Pipe Clips which are always from Plastic to ensure no damage to the
Metal or Plastic parts of the Handle and again Plastic or Plastic Coated
retainers.
For the Glaser Tool
depicted right I have used a Plastic Pipe Clip into which the Handle Clips
and is prevented from slipping down by the lower Handle Grip so conveniently
provided as part of the Glaser Design.
I found with these
generally Heavier Tools it is far better to have a 2-point fixing and
support.
You can either have two
Clips one as shown and one higher up on the Handle where the
"Back" Grip is positioned, but if the Clips are a tight fit you
may find it difficult to extract and replace the Tool.
I prefer to use just one
Clip, as shown with an additional retainer to steady the Tool which is now
slightly top heavy due to the fixing points.
The Retainer is a large Metal
Staple covered with some thin Plastic Tubing and purely acts as a
stabiliser to prevent the Tool moving.
For
my Hamlet and Exocet Tools I have used the two Clip method
as the Tool Head is not always of the right shape to use the previous
method above.
You will find that the
Tool Boss on the Hamlet Tool is the same diameter as the Handle of the
Glaser Tool so if you have both the Clips you get will fit both types of
Tool.
|
|
|
.The
Stewart System [Right] and
it's unique Arm Brace unit is an awkward item to store away it's shape and
out of balance characteristics all work against efficient storage.
The
solution was to make a simple bracket with a cut out for the main bar and
allow the Arm Brace to rest on the platform of the bracket.
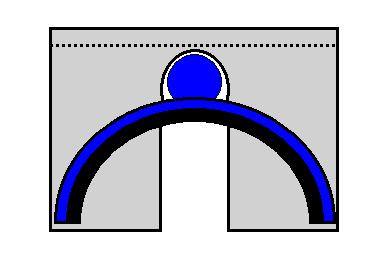
The Bracket
(above) is made from Aluminum but could be made from any suitable
material including Wood.
|
The Handle is of course
larger and therefore require a different size of Clip/Support this however
does not need to be a tight fitting Clip as it's sole purpose is to retain
rather than hold.
This will ensure that the
Tool is easy to remove and replace, in fact a simple "U" shape
bracket into which the Handle can slot will be more than adequate.
The advantages of these
two methods are:
- Easy to Store.
- Can be Located in the
most convenient place.
- No Traps for Shavings
.
- Easy and Cheap to
construct.
- Will allow Tool to be
stored with Angled Heads in place.
You can of course use
these principles for your Wooden Handled Tools if you do not wish to start
Drilling into the Handle.
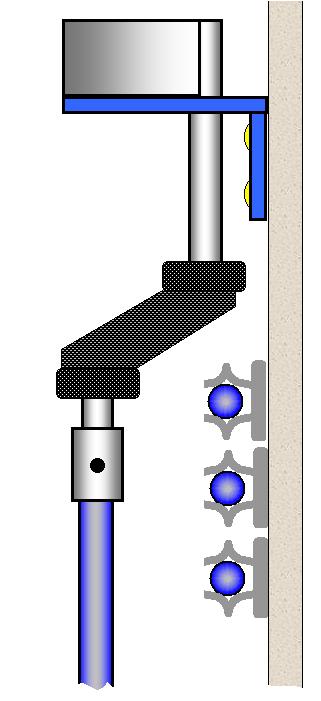
|
The various
3/4"Ø Tool Bars for the Stewart System are supported (horizontally
to stop them slipping out) in Terry Clips (I found some Plastic Coated
ones) on the same Wall Panel as the Brace, as shown in the picture on the
right.
In the picture above
you can see the system being applied to what I call Medium Sized Tools
and to the right I show the Larger Sized Tools with another row placed
behind.
In all there are 34
Chisel and the like stored in quite a small space, and just to the left
in the picture above is the same arrangement for some 10 Small Sized
Tools.
Before you ask why do I
need 44+ Chisels? I do not know, if I use any more than 10 on a regular
bassis I will be surprised. |
|
|
LaymarCrafts Woodturning is the Web
Site of Richard & Sheila Stapley
All Content, Articles, Pictures & Diagrams as Presented are the ©
Copyright of LaymarCrafts & Richard Stapley
Last update 19 July 2007
All Rights Reserved |
|
Web Site Design & Construction by
Richard Stapley. |