| LaymarCrafts Woodturning | Hints & Tips |
| Lathe Support for Flexible Drive via a Drill or Router |
I often use a High Speed Flexible Drive for Embellishment of a Piece, Drilling Holes or Cutting Slots for "Stitched" Work and Sanding Bowls.
Support of the Drill or Router which are two of the three drive methods I utilise is important and the ability to have the support as close to the Work as possible is a prime objective.
It is important that you have the correct Flexible Drive for your Prime Driver, typically the Cheaper Drives from the Hardware Store are for the relatively Slow Speed of a Hand Drill and generally have a Maximum Speed of 3000/3500rpm, a Flexible Drive for use with a Router, which can exceed 25,000rpm, you will need to locate a specilised supplier of High Speed Drives.
I use the Foredom Flexible Drive System which is rated at 18,000rpm and use it with the Router at reduced speed or the Sewing Machine Motor which has a speed of 8,000rpm.
Access to the work piece can be from either side if it is a Bowl particularly if Power Sanding is the function being carried out.
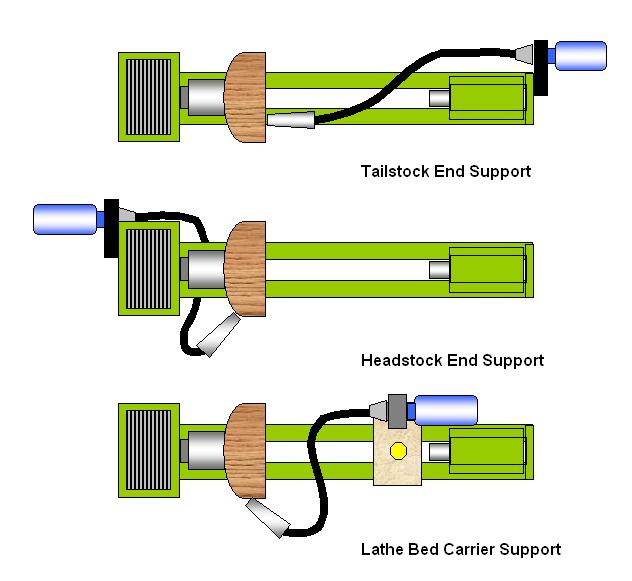
I have devised a number of means of support, all based around the Wolfcraft Universal Drill Clamp (Die Cast Aluminum model) with the 43mm Euro Collar, to cater for the numerous positions around the Lathe that are required.
Above are the three basic positions I use, the Tailstock and Headstock Positions
utilise the same principle at either end of the Lathe and each gives better
access to either side when Power Sanding Bowls, the Lathe Bed Carrier set up is
used only occasionally on special pieces mainly because it is in the way if any
further Turning is required and therefore has to be dismantled and re-set up.

The method of fixing the Clamp to the end of the Lathe is shown in the above Plan View, a suitable piece of 50mm Angle, or a Block (Hardwood, Steel or Aluminum) of the similar size, is Bolted to the End Support of the Lathe, this can be a permanent fixture as it is well out of the way, to this you simply fix the Universal Drill Clamp as shown and then fix your Drill or Router in place.
I say Drill or Router as this will depend on the type of Flexible Drive you own either a Low Speed Type capable of running at no more than 2500rpm and therefore only suitable for use with a Drill or there are High Speed Models that can be run at Speeds that you would normally associate with the Router.
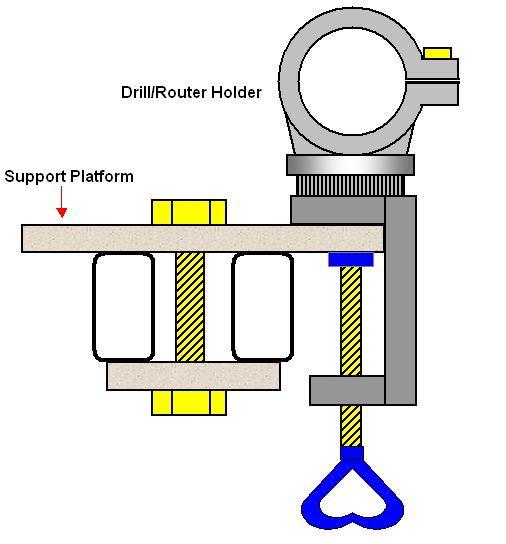
To support the Clamp off of the Bed Bars you make a Platform from typically 12mm
/ 15mm MDF or similar and drill a hole in the middle for the Clamping Bolt to
pass through, a smaller piece of MDF is used to form the lower plate, this also
having a central hole for the Bolt. To this assembly you can fix the Universal
Drill Clamp in any position you choose.
The Top Board needs to protrude beyond the Lathe Bed Bars by at least 50mm on either side if you are to get maximum flexibility for positioning the Carrier Clamp.
Sewing Machine Motor used as a Power Drive for a Flexible Drive Unit
As mentioned above I use either a Drill or a Router to power my Flexible Drive, but I also have a third method, I use a Sewing Machine Motor which has a distinct advantage over the other two in that it comes complete with it's own On/Off Foot Control with Variable Speed.
At first I was not to sure that such a small motor would be suitable but although only 40watt rating it works perfectly and it can be driven up to 8,000rpm, I use it with a Foredom High Speed Flexible Drive and this set up works well with any realistically sized Burr, Cutter or Drill Bit.
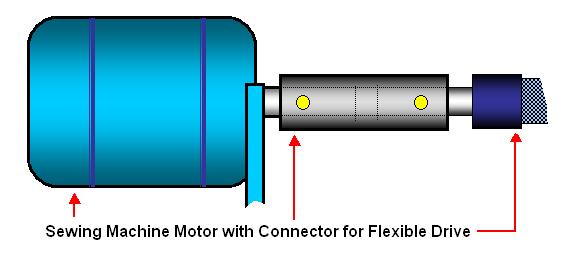
To connect the Motor Shaft to the Flexible Drive Shaft (which in my case are the
same diameter of 6mm) I carefully drilled a 50mm length of 15mm diameter steel
bar to suit and drilled and tapped 2 holes to suit a M3.5 Grub Screw that would clamp
the Connector onto the Motor Shaft and for the Flexible Drive Unit Spindle in
the opposite end.
 |
These Motors already have an ideal mounting
bracket and therefore can easily be mounted onto the Lathe Bed Support or from a
suitable Bracket mounted in a convenient place, in my case I use a M8 Screw and
Wing nut through an existing hole in the Lathe Support Leg.
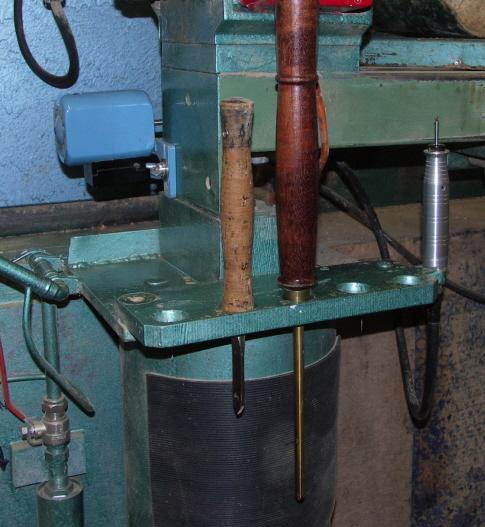
The Sewing Machine Motor mounted to Lathe Bed Support Foot, at 10 o'clock in picture left, with the Foredom Flexible Drive Head, seen on the right. The Head is held in a 22mm Plastic Pipe Clip, for easy access, screwed to the Tool Holder bolted onto the Lathe Support. The Motor On/Off Speed Control Foot Pedal is on the Floor beneath the Lathe. The Tool Holder, which is made from MDF, accommodates up to 5 Tools, usually the Tools that are in use for the Project in hand. When not in use the Sewing Machine Motor and Flexible Drive unit is stored away in a Cupboard as the Motor could be susceptible to the ingress of any dust over a long period as it is what I would term an Open Wound Motor |
Handheld Drill Holder
The use of a Hand Held Drill holder is often referred to in Books on Woodturning and occasionally a Demonstrator will produce one from his bag of tricks to Drill a Hole in a Vase or as a Depth Guide for a Bowl, but they are not so readily available from Woodturning Suppliers.
This is probably for reasons of Safety as this handy addition to any Workshop is not without its Dangers and I therefore only use it with my Safety Switch in Position, but even then this item must be treated with respect and without any degree of complacency.
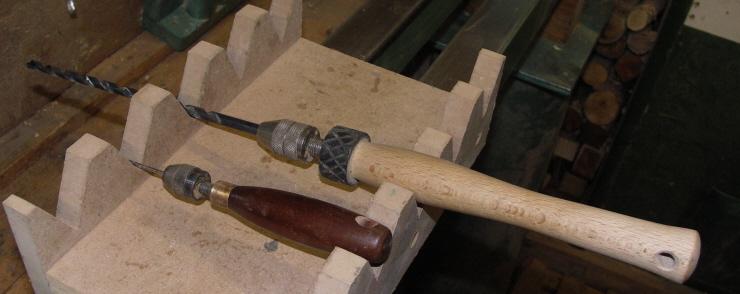
I picked up an old Hand Drill (Double Pinion Type) with a ¼" Keyless Chuck at a Boot Sale for £1, make sure that the Chuck is un-damaged as this will be the most important piece you will use, I then stripped it down until I was left with just the Chuck, on a Stem of about 3" length.
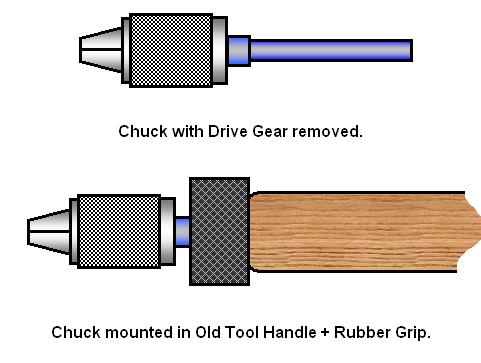
From my Tool Box I retrieved an old Spindle Gouge that was no longer in use and removed the Handle, it was the Handle that I wanted so the Gouge was binned.
I drilled out the Handle to suit the Stem of the Chuck so that it was a good push fit, I then stuck the Chuck Stem into the Handle with a Quick Drying Epoxy.
As a Safety measure to give me more Grip I also glued a Hard Rubber Ring onto the Brass Ferule of the Handle (this is best done before fitting the Chuck into the Handle) and into this I cut a Cross Hatch Pattern using a Carvers Veining Chisel (the same effect could be achieved with a Hacksaw) and this now gives a very positive Grip to the Drill when in use.
|
The Finished Drill Holders |
In the picture above you will see an additional Hand Drill I have recently made for use when a very small Hole is required, the principle of construction is exactly the same as for the much larger version.
|
|
|
LaymarCrafts Woodturning is the Web
Site of Richard & Sheila Stapley Last update 19 July 2007
|
|
Web Site Design & Construction by Richard Stapley. |