| LaymarCrafts
Woodturning |
Hints
& Tips |
| Hollow Form and other Tool Bits |
Their are many Tools that one
can buy for every aspect of Turning but their are just as many you can easily
make from readily available materials for normal Turning and those Special Pieces or
that
Experimental Turning you were always going to attempt.
I have made over the
years many such Tools some are in regular use others never fulfilled their
promise and have either been recycled or discarded, the beauty is they do not
have to cost a fortune.
My average cost would be
in the order of £8 to £10 [$6 to $7] with many of the smaller Tool Bits much
cheaper, so the odd failure is of no great consequence.
You will need some
Engineering Tools if you are going to make the selection described here and I
list these below followed by a list of Materials:-
Tools
- Brazing Torch [MAPP
Gas or Propane sold in Car Accessory Shops or Large DIY Stores].
- Silver Solder and
Flux.
- M6 Tap and Tapping
Drill.
- Selection of Drill
Bits up to 12mm Ø [½" Ø].
- Hacksaw.
- Files.
- Emery Cloth.
- Grinder.
Materials
- Steel Bar of various
diameters from ¼" Ø to ¾" Ø, I use Silver Steel.
- Tool Bits of various
diameters in either High Speed Steel or other Tool Steels such as Cobalt.
- Flat or Square Tool
Bits in HSS or Tool Steel such as Cobalt.
- M6 Grub Screws and Pan
Head Screws or Cap Head Screws.
- Mild Steel Bar
typically 1" x ½".
 |
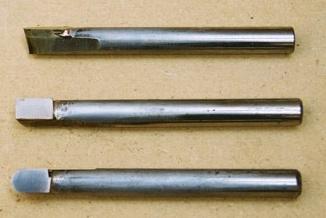
This
Picture shows some of the Tool Steel and Tool Bits I buy from
Engineering Supplies Outlets and Machine Tool Shops.
To the left are
two Tungsten Tipped Cutters with Soft Steel Carriers into which I have
drilled recessed fixing holes enabling me to screw the Cutter to a Tool
Bar.
Various pieces of
Round HSS and Cobalt Tool Steel [Black] which is very Hard and once
Sharpened stays Sharp for a very long time, the 3/8" Ø Cobalt
Steel cost just £2 and the 1/2" Ø HSS Piece shown in the
picture was £1.50.
|
| A
series of Tool Inserts for use with a Boring Bar are made from 1/4"
& 3/8" Ø Silver Steel with the Cutters made from a HSS
Adjustable Reamer Blade.
Blade was cut
using a Angle Grinder and then Silver Soldered to the Silver Steel Bar before
final shaping and sharpening.
The same
principle was used to make a series of longer versions for use with the
Hamlet Tool Holder for freehand Turning or used with the Deep Hollowing
Bar and Trap System.
More examples of
the various shapes you can make are shown in the sketch below, the
shapes are only restricted by your imagination..
|
|


|
This
series of Tool Inserts and Tool Bars use a Bolt on Cutter using either a
Cap Head or Pan Head M6 Set Screw.
The Bar can be
from either Silver Steel or Mild Steel and the End is either filed off
Square so that the Tool Bit sits along the Center Line of the Holder or
Slightly Tapered to offer a Shear Scrape Action when in use.
The Swivel Cutter
in the Picture [top of picture] was made by Silver Soldering a piece of
3/8" Ø HSS into a slot cut into a 1/4" piece of Mild
Steel and then shaped as shown. I also have a 1/2" version.
The other Holders
shown use Standard Cutter Tips from the Stewart Range, Sorby or Sandvick
Scraper Tips.
In
the Sketch below I show the general principle for the shape and design
of the two styles of Tool Bar I use for both the Short and Long Bars.
Generally
a Bar of less than 1/2" Ø has insufficient material for
drilling and tapping, for Bars below this size I would recommend the
Silver Soldered option previously described.
If you have not tried
Brazing then go to the Techniques Section of the LaymarCrafts Web Site for
further information and Links to sites on Brazing. 
|

Another Cutter I have
used very successfully is the Sandvick Range of Scraper Blades, these are
primarily a series of Scrapers for Painters and Decorators but they are made
from Tungsten Carbide and have a very sharp edge and when used correctly they
will give a very fine cut with a fine finish and are therefore very useful for
that Final Finishing Cut.

Another format for a
Swivel Cutter is shown in the Sketches and Photo below, here I have taken the
normal format for a Swivel Cutter but made it a Brazed Assembly which I have
found to be more solid than the "Trap/Clamped" method normally employed.
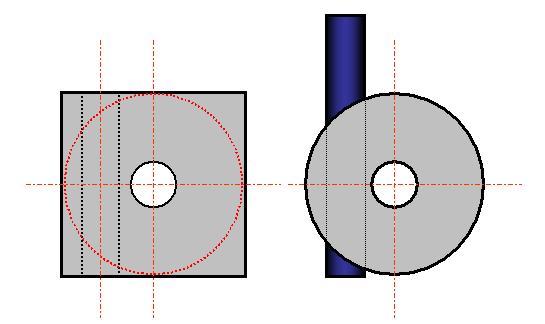

Firstly I
took a piece of 3/8" [9mm] thk Steel approximately 1¼" [32mm] square
and marked out the centre and the position of the centre clamping hole which
would take a M6 Cap Head Screw, then I marked out for the Tool Bit hole.
I used a
3/16" [5mm] Ø HSS Tool Bit and therefore the centre line for this hole
would need to be at least 3/8" [9mm] from the centre line of the centre
hole already marked out, now by standing the Steel Blank on its end you can
easily drill the required 7/32" [5.5mm] Ø hole as shown above.
The
important factor is that the Tool Bit hole will not penetrate the Clamp Screw
Hole, the next step is to cut the Disc and Drill the centre hole and I used a
1" [25mm] Ø HSS Hole Cutter which Cuts the Disc and Drills the hole
in one operation.
Clean up the
Disc and put a chamfer on the edge and if desired you can also counter bore the
centre hole slightly to take the Head of the Cap Screw as I find this gives a
better location and locking.
Clean up the
HSS Tool Bit and add Flux to all the Joint Surfaces before inserting the Tool
Bit ensure that the Tool is the correct way round and support in the Jaws of a
Bench Vise and
Silver Solder in place, once the assembly has cooled down you will need to clean
it up and Grind the Cutter to your final desired shape.

Again
for a nominal cost you can make these very versatile Swivel Cutters and
you can make numerous shapes to suit your needs all of which can be
fitted to any of the Tool Holder Bars described above.
For Deep
Boring you can use a 5/8"Ø and 3/4"Ø Bar with a Cutter [any of
the above] inserted either in line with the Bar Axis or at 45° for undercutting
etc. these are made from Mild Steel and typically with a length of 12" for
a 5/8"Ø Bar and 16" for the 3/4"Ø.

The
5/8"Ø Bars are drilled to take a 1/4"Ø Cutter and the 3/4"Ø
Bars are drilled to take a 3/8"Ø Cutter this ensures that you have
sufficient material for the Grub Screw [M6] which is used to lock the Cutters in
place, you can of course use smaller diameter Cutters to suit if you wish.
An
alternative to the above is to Silver Solder the Cutters in place this allows
for the use of a Larger Cutter to Bar ratio as no allowance for a Grub Screw is
necessary, this is the method I have now adopted and although the Tip is a
permanent fixture, so you will require more Bars/Cutters, I in fact find that I
only use 3 Set Ups and should I ever run out of Cutter I will just De-Solder and
replace the Tip.
|

|
The
two top Bars shown here are of the 45° Cutter using a 3/8"Ø HSS
Tool Bit with a 1/2"Ø Bar.
The procedure for
making this is detailed below.
The Straight
Cutter is made from a 5/8" Ø Bar with a 3/8"Ø Tool Bit with
a Rounded Profile, I also have the same configuration with a Square
Ended Cutter.
The third Bar is
the 5/8" Ø Bar with the Swivel Head Tool Bit as described above.
|

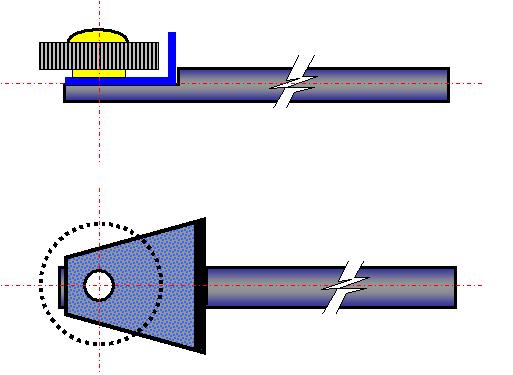
To
fit the Tool Bit I first Ground, using a Angle Grinder, a groove into
the end of the Bar, which should be the diameter if the Tool bit plus
about 1mm ["A" in diagram above], into which the Tool Bit slotted I then Silver Soldered
it in place before Grinding both the holding bar and the Tool bit to
shape..

Tool Bit placed in Slot Ground
into Tool Bar and Brazed, Grind off the excess Tool Bit at rear of the Bar and
shape the Bar so that the in use the cutting edge of the Tool Bit can reach
the bottom of the Work Piece you are Turning.
Whilst I was
in the Tool Bar making mood I took time out to also make a Holder for the Sorby
Texturing System with the added feature of a Protection Guard, this was to be
used with to the Hamlet Handle.
I started
with a 1/2" Ø Bar 8" long [200mm] and shaped the end, with a Grinder
and finished of with a File, down to the center line and for a length of 45mm [1¾"]
I then drilled and tapped a M8 hole 10mm [7/16"] in from the end, the
M8 Set Screw is a good fit in the Bearing which is inserted in the Texturing
Wheel.
For the
Guard I used a triangular piece of 16g Sheet Steel, bent as shown and then put
in place before marking of the position for the 9mm [3/8"] hole. It is
advisable to round of any protruding corners of the Guard as a precaution.
To assemble
I simply used a M8 Pan Head Set Screw through the Texture Wheel, placed a
suitable Washer as a spacer at the back of the Wheel then trapped the Guard
between the Washer and the Flat on the Bar.
This gives
you a Guard that does not get in your way and allows the Tool Rest to be
positioned a realistic distance from the Work piece which gives you better
control of the Texturing Tool.


Note!
Their are no limits to the number of Shapes and Sizes of Tool or Cutter you can make, and
providing you follow a few basic rules and do not overstretch the limits
of the Materials you are using, they should be safe and worthwhile
additions to your arsenal of Tools.
Remember
large overhangs with thin materials will generate vibration and even
cause permanent bending and possibly fracture rendering your efforts useless, so make any Tool
with the maximum amount of material as possible if the overhang from the
Tool Rest is going to be further than normal which is often the case
when Deep Boring.
Not
all Steels offer the same degree of strength, I tend to use Silver Steel
for my Tool Bars as it is Strong, relatively Cheap to buy and is readily
available, and will bend rather than fracture.
Experiment
you can often go back and re-shape any design if it does not quite work
out right first time, even if you scrap it, it will have not cost you a
fortune and you will have at least learnt something.
Hollow Form Shavings Extractors "Emptier's"
Having now
kitted yourself out with a Hollow Form Turning System you are left with only one
problem! getting the Shavings out of the thing, leave this task for too long
when Turning and you will soon suffer the consequences.
I have made
a whole number of different Shapes and Sizes based on either Scraping or Spooning Out
the Shavings and Dust trapped within any Hollow Form.
Size and
Length of each design is determined by the Depth of Vessels you intend to make
and the Size of the Opening, if you are Turning both Small and Large Vessels
then a selection of all styles in various Sizes and Lengths may be required.
I have used
various odds and ends of Steel Rod and Tubing for supporting Round Scrapers,
Bent Scrapers and Spoons generally as shown below.
I find a
good sized Handle at one end is ideal and comfortable to use and at the same
time gives a good grip and control, again I have used an assortment of Old
Chunky Pen Barrels, Pipe, Wooden Handles and Plastic/Rubber Hose whatever is
around at the time.

My
collection runs to 8 "Emptier's" as I call them and each new Vessel is
either satisfied by these or you just make up a new one to suit, below are just
5 showing an assortment of Handles.
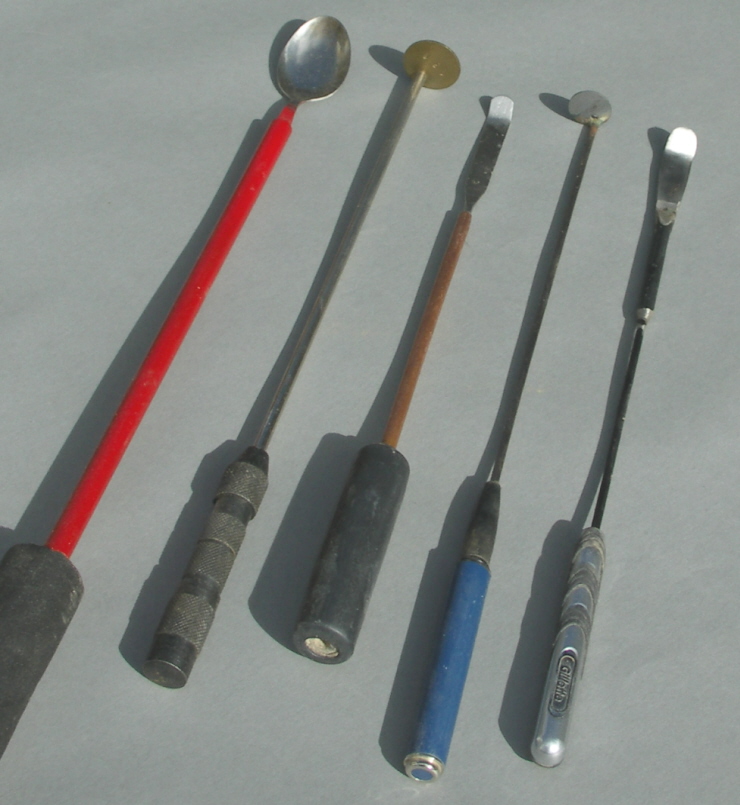
The
Spoon on the left, is just that, epoxied into a piece of steel tubing with a foam
rubber handle, then their is a disc scrapper with the handle from an old
automatic center punch, in the middle we have an old modelers tool again epoxied
into a piece of tube [copper] with a turned wooden handle with a thin rubber
covering.
Those
on the right of the picture use the barrel from a pen and an old razor handle
drilled out to take the stem which happens to be an old mobile phone car aerial.
|
LaymarCrafts Woodturning is the Web
Site of Richard & Sheila Stapley
All Content, Articles, Pictures & Diagrams as Presented are the ©
Copyright of LaymarCrafts & Richard Stapley
Last update 19 July 2007
All Rights Reserved |
|
Web Site Design & Construction by
Richard Stapley. |